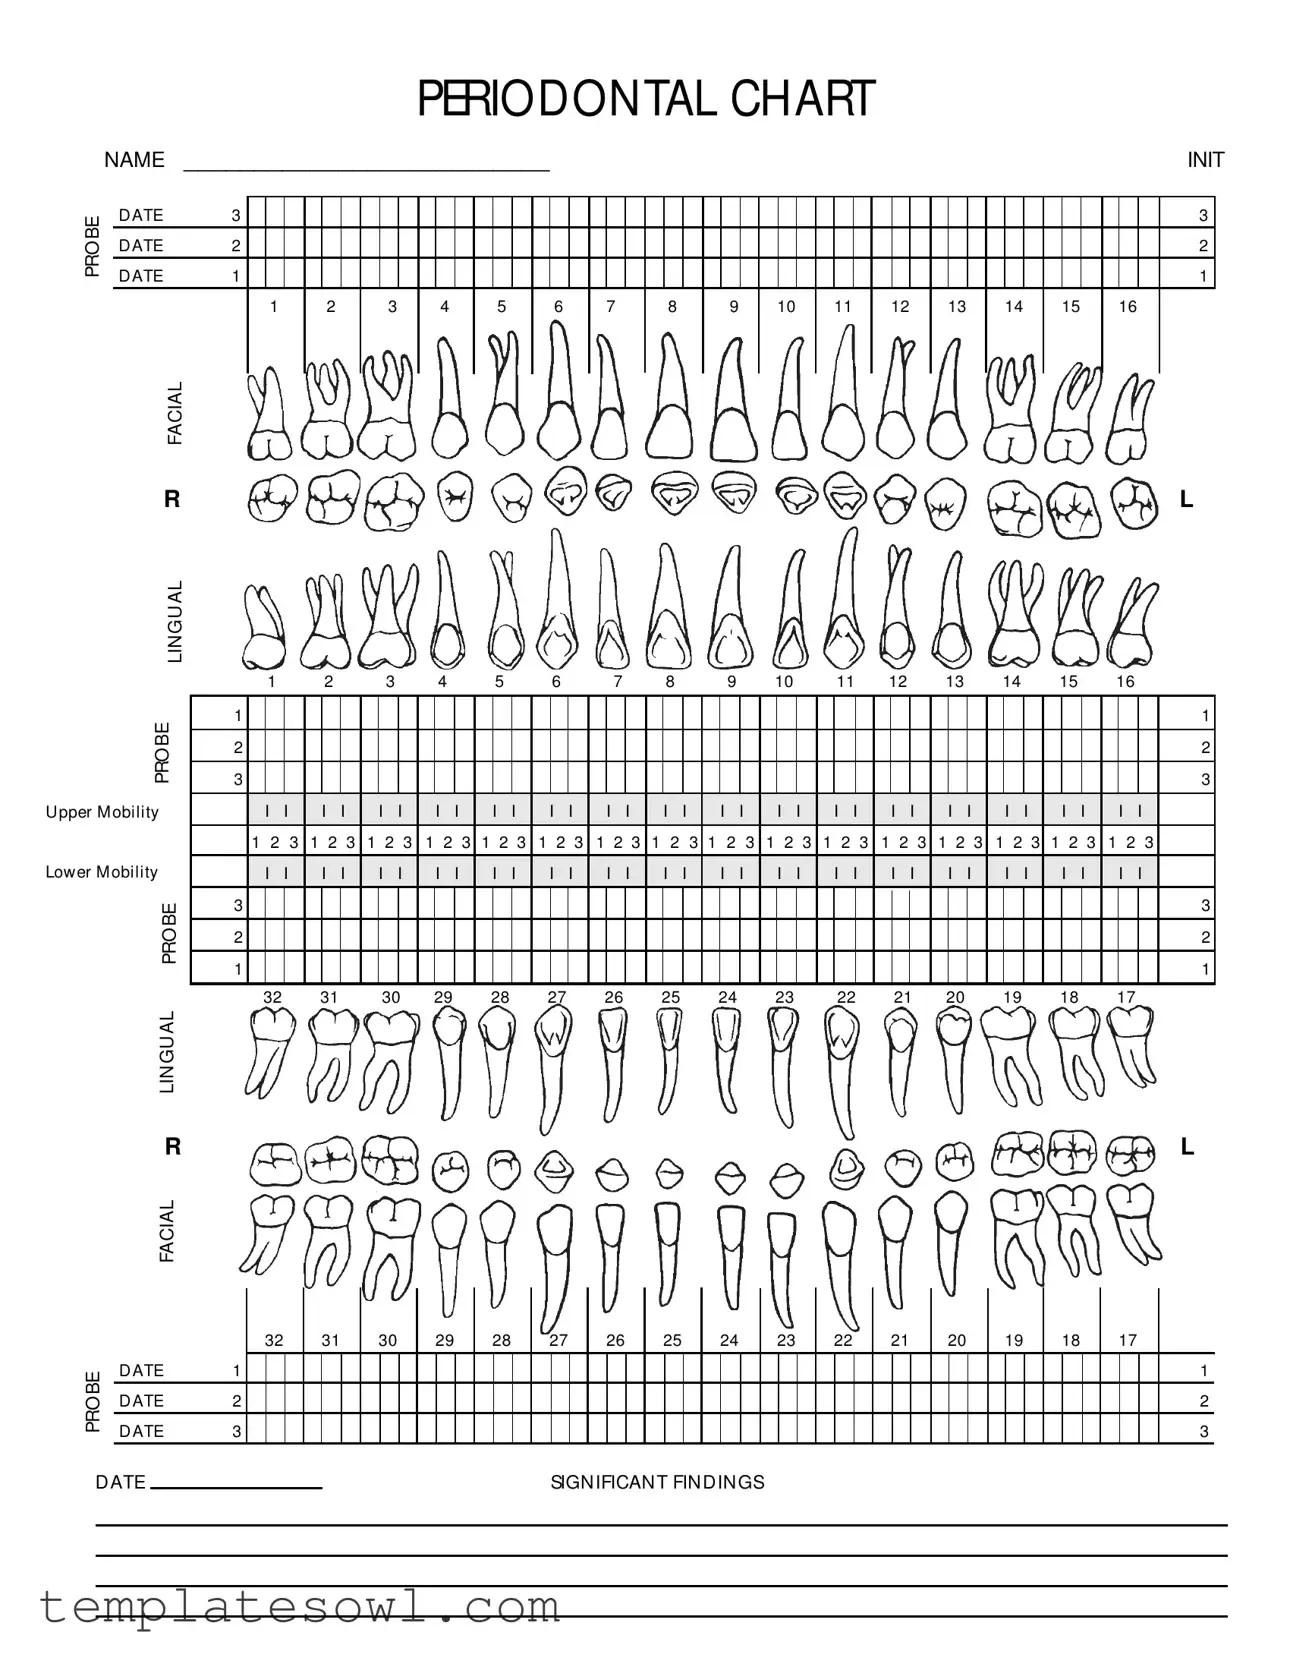
Fill Out Your Perio Chart Form
The Perio Chart form serves as a critical tool in evaluating and documenting a patient's periodontal health. With a structured layout, it captures essential diagnostic information, enabling dental professionals to assess conditions such as clinical attachment loss, bleeding on probing, and probing depth. Each section is meticulously designed to facilitate the tracking of both pre-treatment states and re-evaluations, emphasizing the dynamic nature of periodontal care. The chart includes spaces for recording patient names, file numbers, and dates, making comprehensive follow-up straightforward. Clear indicators for significant signs, such as plaque and calculus presence, further enhance its utility; for example, a simple asterisk indicates the existence of plaque, while specific notations for gingival margin and mobility aid in conveying detailed treatment plans. Instructors and practitioners alike recognize the importance of accurately marking findings to ensure continuity of care and effective management of periodontal issues. The involvement of a supervisor’s signature additionally underscores the importance of oversight and accountability within treatment protocols.
Perio Chart Example
PERIODONTAL CHART
|
NAME |
__________________________ |
|
|
|
|
|
|
|
|
|
|
|
|
|
|
|
|
|
|
|
|
|
|
|
|
|
|
|
|
|
|
|
|
INIT |
|||||||||||||||||||
|
|
|
|
|
|
|
|
|
|
|
|
|
|
|
|
|
|
|
|
|
|
|
|
|
|
|
|
|
|
|
|
|
|
|
|
|
|
|
|
|
|
|
|
|
|
|
|
|
|
|
|
|
|
|
BE |
|
D ATE |
3 |
|
|
|
|
|
|
|
|
|
|
|
|
|
|
|
|
|
|
|
|
|
|
|
|
|
|
|
|
|
|
|
|
|
|
|
|
|
|
|
|
|
|
|
|
|
|
|
|
3 |
|
|
|
D ATE |
2 |
|
|
|
|
|
|
|
|
|
|
|
|
|
|
|
|
|
|
|
|
|
|
|
|
|
|
|
|
|
|
|
|
|
|
|
|
|
|
|
|
|
|
|
|
|
|
|
|
2 |
|
||
PRO |
|
|
|
|
|
|
|
|
|
|
|
|
|
|
|
|
|
|
|
|
|
|
|
|
|
|
|
|
|
|
|
|
|
|
|
|
|
|
|
|
|
|
|
|
|
|
|
|
|
|
||||
|
D ATE |
1 |
|
|
|
|
|
|
|
|
|
|
|
|
|
|
|
|
|
|
|
|
|
|
|
|
|
|
|
|
|
|
|
|
|
|
|
|
|
|
|
|
|
|
|
|
|
|
|
|
1 |
|
||
|
|
|
|
|
|
|
|
|
|
|
|
|
|
|
|
|
|
|
|
|
|
|
|
|
|
|
|
|
|
|
|
|
|
|
|
|
|
|
|
|
|
|
|
|
|
|
|
|
|
|
||||
|
|
|
|
|
|
|
|
|
|
|
|
|
|
|
|
|
|
|
|
|
|
|
|
|
|
|
|
|
|
|
|
|
|
|
|
|
|
|
|
|
|
|
|
|
|
|
|
|
|
|
|
|
|
|
|
|
|
|
1 |
|
2 |
|
3 |
|
4 |
|
5 |
|
6 |
|
7 |
|
8 |
|
9 |
|
10 |
|
11 |
|
12 |
|
13 |
|
14 |
|
15 |
|
16 |
|
|
|
|||||||||||||||||
|
|
FACIAL |
|
|
|
|
|
|
|
|
|
|
|
|
|
|
|
|
|
|
|
|
|
|
|
|
|
|
|
|
|
|
|
|
|
|
|
|
|
|
|
|
|
|
|
|
|
|
|
|
|
|
|
|
|
|
|
|
|
|
|
|
|
|
|
|
|
|
|
|
|
|
|
|
|
|
|
|
|
|
|
|
|
|
|
|
|
|
|
|
|
|
|
|
|
|
|
|
|
|
|
|
|
|
|
|
|
|
|
|
|
R |
|
|
|
|
|
|
|
|
|
|
|
|
|
|
|
|
|
|
|
|
|
|
|
|
|
|
|
|
|
|
|
|
|
|
|
|
|
|
|
|
|
|
|
|
|
|
|
|
|
|
L |
|
|
|
LIN GU AL |
|
|
|
|
|
|
|
|
|
|
|
|
|
|
|
|
|
|
|
|
|
|
|
|
|
|
|
|
|
|
|
|
|
|
|
|
|
|
|
|
|
|
|
|
|
|
|
|
|
|
|
|
|
|
|
1 |
|
2 |
|
3 |
|
4 |
|
5 |
|
6 |
|
7 |
|
8 |
|
9 |
|
10 |
|
11 |
|
12 |
|
13 |
|
14 |
|
15 |
|
16 |
|
|
|
||||||||||||||||||
|
|
|
|
|
|
|
|
|
|
|
|
|
|
|
|
|
|
|
|
|
|
|
|
|
|
|
|
|
|
|
|
|
|
|
|
|
|
|
|
|
|
|
|
|
|
|
|
|
|
|
|
|
|
|
|
|
BE |
|
1 |
|
|
|
|
|
|
|
|
|
|
|
|
|
|
|
|
|
|
|
|
|
|
|
|
|
|
|
|
|
|
|
|
|
|
|
|
|
|
|
|
|
|
|
|
|
|
|
|
1 |
|
|
|
|
|
|
|
|
|
|
|
|
|
|
|
|
|
|
|
|
|
|
|
|
|
|
|
|
|
|
|
|
|
|
|
|
|
|
|
|
|
|
|
|
|
|
|
|
|
|
|
|
|
|
|
|
|
|
|
2 |
|
|
|
|
|
|
|
|
|
|
|
|
|
|
|
|
|
|
|
|
|
|
|
|
|
|
|
|
|
|
|
|
|
|
|
|
|
|
|
|
|
|
|
|
|
|
|
|
2 |
|
|
|
|
PRO |
|
|
|
|
|
|
|
|
|
|
|
|
|
|
|
|
|
|
|
|
|
|
|
|
|
|
|
|
|
|
|
|
|
|
|
|
|
|
|
|
|
|
|
|
|
|
|
|
|
|
||
|
|
|
|
|
|
|
|
|
|
|
|
|
|
|
|
|
|
|
|
|
|
|
|
|
|
|
|
|
|
|
|
|
|
|
|
|
|
|
|
|
|
|
|
|
|
|
|
|
|
|
|
|
|
|
|
|
|
3 |
|
|
|
|
|
|
|
|
|
|
|
|
|
|
|
|
|
|
|
|
|
|
|
|
|
|
|
|
|
|
|
|
|
|
|
|
|
|
|
|
|
|
|
|
|
|
|
|
3 |
|
|
|
|
|
|
|
|
|
|
|
|
|
|
|
|
|
|
|
|
|
|
|
|
|
|
|
|
|
|
|
|
|
|
|
|
|
|
|
|
|
|
|
|
|
|
|
|
|
|
|
|
|
|
|
|
|
U pper M obility |
|
|
|
I |
I |
|
I |
I |
|
I I |
|
I |
I |
|
I |
I |
|
I |
I |
|
I |
I |
|
I |
I |
|
I |
I |
|
I |
I |
|
I I |
|
I |
I |
|
I |
I |
|
I |
I |
|
I |
I |
|
I |
I |
|
|
||||
|
|
|
|
|
1 2 3 |
1 2 3 |
1 2 3 |
1 2 3 |
1 2 3 |
1 2 3 |
1 2 3 |
1 2 3 |
1 2 3 |
1 2 3 |
1 2 3 |
1 2 3 |
1 2 3 |
1 2 3 |
1 2 3 |
1 2 3 |
|
|
||||||||||||||||||||||||||||||||
Low er M obility |
|
|
|
I |
I |
|
I |
I |
|
I I |
|
I |
I |
|
I |
I |
|
I |
I |
|
I |
I |
|
I |
I |
|
I |
I |
|
I |
I |
|
I I |
|
I |
I |
|
I |
I |
|
I |
I |
|
I |
I |
|
I |
I |
|
|
||||
|
|
BE |
|
3 |
|
|
|
|
|
|
|
|
|
|
|
|
|
|
|
|
|
|
|
|
|
|
|
|
|
|
|
|
|
|
|
|
|
|
|
|
|
|
|
|
|
|
|
|
|
|
|
|
3 |
|
|
|
|
|
|
|
|
|
|
|
|
|
|
|
|
|
|
|
|
|
|
|
|
|
|
|
|
|
|
|
|
|
|
|
|
|
|
|
|
|
|
|
|
|
|
|
|
|
|
|
|
|
|
|
|
|
|
|
|
|
|
|
|
|
|
|
|
|
|
|
|
|
|
|
|
|
|
|
|
|
|
|
|
|
|
|
|
|
|
|
|
|
|
|
|
|
|
|
|
|
|
|
|
|
|
|
|
|
|
|
|
|
PRO |
|
2 |
|
|
|
|
|
|
|
|
|
|
|
|
|
|
|
|
|
|
|
|
|
|
|
|
|
|
|
|
|
|
|
|
|
|
|
|
|
|
|
|
|
|
|
|
|
|
|
|
2 |
|
|
|
|
|
|
|
|
|
|
|
|
|
|
|
|
|
|
|
|
|
|
|
|
|
|
|
|
|
|
|
|
|
|
|
|
|
|
|
|
|
|
|
|
|
|
|
|
|
|
|
|
|
|
||
|
|
|
|
|
|
|
|
|
|
|
|
|
|
|
|
|
|
|
|
|
|
|
|
|
|
|
|
|
|
|
|
|
|
|
|
|
|
|
|
|
|
|
|
|
|
|
|
|
|
|
|
|
|
|
|
|
|
|
1 |
|
|
|
|
|
|
|
|
|
|
|
|
|
|
|
|
|
|
|
|
|
|
|
|
|
|
|
|
|
|
|
|
|
|
|
|
|
|
|
|
|
|
|
|
|
|
|
|
1 |
|
|
|
|
|
|
|
|
|
|
|
|
|
|
|
|
|
|
|
|
|
|
|
|
|
|
|
|
|
|
|
|
|
|
|
|
|
|
|
|
|
|
|
|
|
|
|
|
|
|
|
|
|
|
|
|
|
|
|
32 |
|
31 |
|
30 |
29 |
|
28 |
|
27 |
|
26 |
|
25 |
|
24 |
|
23 |
|
22 |
|
21 |
20 |
|
19 |
|
18 |
|
17 |
|
|
|
||||||||||||||||||||
|
|
LIN GU AL |
|
|
|
|
|
|
|
|
|
|
|
|
|
|
|
|
|
|
|
|
|
|
|
|
|
|
|
|
|
|
|
|
|
|
|
|
|
|
|
|
|
|
|
|
|
|
|
|
|
|
|
|
|
|
R |
|
|
|
|
|
|
|
|
|
|
|
|
|
|
|
|
|
|
|
|
|
|
|
|
|
|
|
|
|
|
|
|
|
|
|
|
|
|
|
|
|
|
|
|
|
|
|
|
|
|
L |
|
|
|
FACIAL |
|
|
|
|
|
|
|
|
|
|
|
|
|
|
|
|
|
|
|
|
|
|
|
|
|
|
|
|
|
|
|
|
|
|
|
|
|
|
|
|
|
|
|
|
|
|
|
|
|
|
|
|
PRO BE
|
|
|
32 |
|
31 |
|
30 |
|
29 |
|
28 |
|
27 |
|
26 |
|
25 |
|
24 |
|
23 |
|
22 |
|
21 |
|
20 |
|
19 |
|
18 |
|
17 |
|
|
||||||||||||||||
|
|
|
|
|
|
|
|
|
|
|
|
|
|
|
|
|
|
|
|||||||||||||||||||||||||||||||||
|
|
|
|
|
|
|
|
|
|
|
|
|
|
|
|
|
|
|
|
|
|
|
|
|
|
|
|
|
|
|
|
|
|
|
|
|
|
|
|
|
|
|
|
|
|
|
|
|
|
|
|
|
D ATE |
1 |
|
|
|
|
|
|
|
|
|
|
|
|
|
|
|
|
|
|
|
|
|
|
|
|
|
|
|
|
|
|
|
|
|
|
|
|
|
|
|
|
|
|
|
|
|
|
|
|
1 |
|
|
|
|
|
|
|
|
|
|
|
|
|
|
|
|
|
|
|
|
|
|
|
|
|
|
|
|
|
|
|
|
|
|
|
|
|
|
|
|
|
|
|
|
|
|
|
|
|
|
|
|
|
D ATE |
2 |
|
|
|
|
|
|
|
|
|
|
|
|
|
|
|
|
|
|
|
|
|
|
|
|
|
|
|
|
|
|
|
|
|
|
|
|
|
|
|
|
|
|
|
|
|
|
|
|
2 |
|
D ATE |
3 |
|
|
|
|
|
|
|
|
|
|
|
|
|
|
|
|
|
|
|
|
|
|
|
|
|
|
|
|
|
|
|
|
|
|
|
|
|
|
|
|
|
|
|
|
|
|
|
|
3 |
D ATE |
|
SIGN IFICAN T FIN D IN GS |
|
|
|
|
|
|
|
|
|
|
|
|
Form Characteristics
| Fact Name | Description |
|---|---|
| Patient Information | The form requires the patient's name, file number, and date at the top for proper identification. |
| Purpose of the Chart | This chart documents the periodontal examination, treatment, and follow-up care for patients. |
| Key Terms | It includes abbreviations like CAL (Clinical Attachment Loss), CEJ (Cementoenamel Junction), and PD (Probing Depth) for clarity. |
| Findings Documentation | Important clinical findings such as mobility, calculus, and bleeding are recorded during the examination. |
| Compliance with Guidelines | This form follows the guidelines set forth by the American Academy of Periodontology for periodontal assessment. |
| Supervisor's Role | A supervisor must sign the chart to validate the findings and confirm the treatment plan. |
| State Regulations | For specific state requirements, consult local laws on patient record-keeping and periodontal documentation. |
Guidelines on Utilizing Perio Chart
Completing the Perio Chart form accurately is essential for appropriate diagnosis and treatment planning. Follow these steps carefully to ensure that each section of the form is filled out thoroughly, providing all necessary details for the healthcare provider.
- Patient Information: Write the patient's name in the space provided for "PATIENT NAME." Fill in the "FILE NO." and "DATE" fields with the correct information.
- Diagnosis Section: In the diagnosis area, assess the patient's periodontal status and record findings like Clinical Attachment Loss (CAL), Bleeding on Probing (BOP), Probing Depth (PD), Plaque Index (PI), and Calculus (Calc) accordingly.
- Facial and Lingual Measurements: Measure both the facial and lingual sides. For CAL, BOP, PD, PI, and Calc, enter the relevant data for each area on the chart. Use asterisks to mark the presence of plaque and calculus.
- Mobility Assessment: Evaluate tooth mobility and document findings under the appropriate section for both facial and lingual measurements.
- Gingival Margin (GM) and Cementoenamel Junction (CEJ) Observations: Note the relationship between the gingival margin and cementoenamel junction in the designated areas on the form as well.
- Final Checks: Review all entries for accuracy. Ensure all necessary sections are filled in completely.
- Bleeding Index: If relevant, complete the Bleeding Index section to indicate any bleeding during probing.
- Supervisor’s Signature: After reviewing the form, have the supervisor sign at the designated area to validate the findings.
What You Should Know About This Form
What is a Perio Chart?
A Perio Chart, or periodontal chart, is a form used by dental professionals to assess the health of a patient's gums and supporting structures. It records various measurements that help identify issues such as gum disease or attachment loss, guiding treatment decisions.
What information is included in the Perio Chart form?
The Perio Chart form includes the patient's name, file number, date, and multiple diagnostic indicators. These indicators note information such as clinical attachment loss (CAL), bleeding on probing (BOP), probing depths (PD), and the presence of plaque and calculus (Calc). Additionally, it records the gingival margin (GM) and mobility of teeth.
How is the Perio Chart completed?
Dentists or hygienists complete the Perio Chart during a dental examination. They use a periodontal probe to measure the depth of the gum pockets around each tooth. This information is then recorded on the chart, allowing for an organized evaluation of periodontal health.
Why is it important to assess bleeding on probing (BOP)?
Bleeding on probing is a crucial indicator of gum health. If bleeding occurs during probing, it often suggests inflammation or gum disease. Tracking BOP helps professionals diagnose periodontal conditions and determine appropriate treatment strategies.
What do the terms CAL and PD mean?
CAL, or clinical attachment loss, measures the amount of gum tissue that has detached from the tooth. PD, or probing depth, indicates how deep the gum pockets are around each tooth. Both measurements are essential in determining the severity of periodontal disease and guiding the treatment plan.
How often should a Perio Chart be updated?
The Perio Chart should be updated regularly, typically during routine dental check-ups or as part of the treatment process for periodontal disease. Frequent updates ensure that any changes in gum health are monitored and addressed promptly.
What is the significance of the Plaque Index (PI)?
The Plaque Index (PI) assesses the presence of plaque on teeth. The presence of plaque is a significant factor in periodontal disease development. By recording the PI, dental professionals can evaluate oral hygiene practices and suggest improvements when necessary.
What do the terms "Mobility" and "CEJ" refer to on the chart?
Mobility indicates whether a tooth is loose. The assessment is based on how much movement is observed when pressure is applied. CEJ stands for cementoenamel junction. It is the point where the enamel covering the tooth meets the cementum, which is the outer layer of the root of the tooth. This junction is important for measuring attachment loss accurately.
What is the role of the Supervisor's Signature on the form?
The Supervisor's Signature indicates that the assessment and findings on the Perio Chart have been reviewed and approved by a qualified professional. This step is vital for ensuring that accurate records are maintained and that proper care protocols are followed.
Can the Perio Chart help in treatment planning?
Yes, the Perio Chart is instrumental in treatment planning. By providing a comprehensive overview of a patient’s periodontal health, it helps dental professionals design individualized treatment plans that address specific issues, improve oral health, and prevent further complications.
Common mistakes
When it comes to completing the Perio Chart form, mistakes can lead to inaccuracies that affect patient care and treatment outcomes. One of the most common mistakes is failing to provide the patient's name and file number at the top of the form. This information is crucial for proper record-keeping and ensuring that the patient's data is linked to their medical history.
Another frequent error involves omitting the date of the assessment. Without a date, it becomes challenging to track the progression of periodontal health over time. Every evaluation should be documentarily clear to assist dental professionals in making informed decisions during future appointments.
Many people also struggle with accurately interpreting the diagnosis codes on the form. Each abbreviation, such as CAL for Clinical Attachment Loss or PD for Probing Depth, has specific meanings that must be understood. Misinterpreting these terms can lead to a misunderstanding of the patient's periodontal status, potentially jeopardizing their treatment plan.
When filling out the measurements, individuals often forget to indicate the presence of plaque or calculus by placing an asterisk. This lack of notation can lead to overlooking essential aspects of periodontal health and affecting the overall evaluation significantly.
Another mistake occurs when practitioners fail to record the Bleeding on Probing (BOP) accurately. This vital indicator is integral to assessing periodontal health. Neglecting to note when bleeding occurs can result in an incomplete picture of the patient's gum health.
In addition, recording the mobility of teeth often gets overlooked. Notations about tooth movement are critical in monitoring the progression of periodontal disease, and neglecting this information can hinder effective treatment planning.
Another common oversight is mislabeling the sites as facial or lingual. Correctly identifying the sides of the mouth ensures that the chart reflects an accurate assessment of periodontal health.
Many individuals also fall into the habit of using vague terms rather than precise measurements when documenting the Probing Depth or Clinical Attachment Loss. This lack of precision can lead to miscalculations in periodontal assessments.
Finally, neglecting to obtain a supervisor’s signature can invalidate the entire form. The supervisor's approval is critical for confirming the accuracy and professionalism of the periodontal examination.
These common mistakes highlight the importance of attention to detail when completing the Perio Chart form. By avoiding these pitfalls, dental professionals can ensure they provide the highest standard of care for their patients.
Documents used along the form
The Perio Chart form is an essential tool in the world of dental care, particularly for managing periodontal health. When used to track a patient's periodontal disease and treatment progress, this form often accompanies several other documents that streamline the process. Here’s a look at five key forms commonly utilized along with the Perio Chart.
- Patient Medical History Form: This document collects comprehensive information about a patient's overall health, including past medical conditions, medications, and allergies. This history is crucial for safely planning dental treatments.
- Consent for Treatment Form: Before beginning any dental procedures, it's important to obtain a patient's explicit consent. This form outlines the treatment plan and potential risks, ensuring the patient is well-informed.
- Dental Charting Form: This form documents the current condition of each tooth, covering issues such as cavities, extractions, and restorations. It's often used alongside the Perio Chart to give a complete picture of oral health.
- Treatment Plan Form: This outlines the recommended course of treatment based on the findings in the Perio Chart and Dental Chart. It helps ensure that both the dental team and the patient are on the same page regarding the next steps.
- Follow-Up Care Instructions: After treatment, this form provides specific guidance on how to care for teeth and gums. It may include tips on brushing, flossing, and scheduling future appointments to maintain periodontal health.
These forms play a vital role in creating a comprehensive dental care experience. By working together, they help ensure that the patient's periodontal health is accurately assessed and effectively managed.
Similar forms
-
Dental Chart: This document provides a comprehensive overview of a patient's dental health. It includes information about existing dental issues, treatments received, and recommendations for future care. Similar to a Perio Chart, it serves as a visual record to track patient progress over time.
-
Medical History Form: This form collects a patient's health background, including any medical conditions, medications, and allergies. It is essential for understanding how a patient's overall health may impact dental treatment. Like the Perio Chart, it is used to inform clinical decisions and care plans.
-
Radiographic Report: This report details the findings from dental radiographs, such as X-rays. It identifies areas of concern that may require attention. Both documents are crucial for diagnosing oral health issues and planning appropriate treatments.
-
Treatment Plan: A treatment plan outlines the recommended dental treatments based on the findings from the Perio Chart and other examinations. The treatment plan helps ensure that all healthcare providers are on the same page about a patient's care process.
-
Recall or Maintenance Form: This form is used to track patients who require regular follow-up appointments. It emphasizes the importance of preventive care and ongoing monitoring, much like the periodic assessments indicated in a Perio Chart.
-
Appointment Summary: This document summarizes what occurred during a patient’s visit, including procedures performed and any findings. It plays a similar role to the Perio Chart by providing a record of patient interactions and ongoing care.
Dos and Don'ts
Filling out the Perio Chart form accurately is essential for effective periodontal evaluation. Here are some helpful dos and don'ts to guide you through the process:
- Do write your name clearly at the top of the form.
- Don't rush the process; take your time to ensure accuracy.
- Do use a pen for permanent entries, avoiding pencils or erasable ink.
- Don't leave any sections blank; fill in all relevant fields.
- Do check for clarity when recording data; legibility is key.
- Don't assume any information; verify with your dental provider if unsure.
- Do have your supervisor review the chart for completeness before submission.
By keeping these tips in mind, you can contribute to a well-organized and informative Perio Chart that effectively serves your dental team and supports your treatment plan.
Misconceptions
Understanding the Perio Chart form is essential for both healthcare providers and patients. However, several misconceptions may lead to confusion about its purpose and function. Below are some common misunderstandings, along with explanations to clarify them.
- The Perio Chart is only for patients with advanced gum disease. Many people think that this chart is solely for those diagnosed with severe periodontal disease. In reality, it is a valuable tool for tracking gum health at all stages, allowing for early intervention and preventive care.
- The chart is just a technical tool and doesn't reflect my personal health. Some believe the Perio Chart is merely a technical document without any personal relevance. However, the information it contains helps dental professionals tailor treatment plans specific to each patient's unique oral health needs.
- Once filled out, the Perio Chart doesn't require any updates. A common misconception is that the Perio Chart remains static once completed. The truth is that ongoing evaluations and updates are crucial, particularly following treatment or during regular check-ups to monitor changes in gum health.
- I need to understand all the abbreviations and terms on my own. Many individuals feel pressured to decode the medical jargon of the Perio Chart independently. While it contains specific terminology, healthcare providers are available to explain these terms and ensure patients fully comprehend their implications for oral health.
- The chart is not useful if I am not experiencing symptoms. Some patients may believe that if they feel fine, there is no need for a Perio Chart. Preventive assessments are vital, as many periodontal issues can develop without noticeable symptoms. Regular evaluations can help catch concerns early on.
- The Perio Chart is exclusively used by dentists. While dentists often utilize the Perio Chart, they are not its only users. Dental hygienists and other dental professionals also rely on this form for comprehensive evaluations of a patient’s gum health and ongoing care plans.
By addressing these misconceptions, clearer communication can develop between patients and dental professionals, fostering a better understanding of oral health and the importance of periodontal care.
Key takeaways
When using the Perio Chart form, consider these key takeaways to ensure accurate and effective documentation:
- Accurate Patient Information: Always fill out the patient's name, file number, and date at the top of the form. This helps in maintaining proper records and facilitates easier follow-up.
- Comprehensive Assessment: Document all relevant clinical findings, including CAL (Clinical Attachment Loss), BOP (Bleeding on Probing), and specific measurements like Probing Depth. Completeness is crucial for determining the periodontal status.
- Use of Symbols: Remember to use the designated symbols when noting the presence of plaque or calculus. Asterisks (*) indicate plaque presence and red marks for bleeding on probing. This visual aid enhances clarity.
- Periodic Review: Regular reviews and updates of the Perio Chart during patient visits are essential. Not only does this tracking aid in treatment planning, but it also ensures continuity of care.
Keep these takeaways in mind to streamline the process and maintain high standards in patient care.
Browse Other Templates
Equitable Withdrawal Form - Consider potential costs involved in taking a hardship withdrawal, as these may impact the total amount received.
Dl-90a - The affidavit showcases accountability between instructors and their students.
North Carolina Dmv Forms - Completing the MVR-614 ensures that military families can legally garage their vehicles in the state.