Fill Out Your Photosynthesis Diagrams Worksheet Form
The Photosynthesis Diagrams Worksheet serves as an essential educational tool designed to enhance students' understanding of the complex process of photosynthesis. This worksheet is divided into three parts, encouraging both recognition and application of key concepts. In the first section, learners engage with a diagram that requires them to label various components involved in photosynthesis, such as the leaf, cuticle, and chloroplasts. The second part challenges students to utilize Diagram A as a reference point for accurately labeling another diagram, reinforcing their comprehension of the subject matter. Finally, the third part requires students to identify and label important elements relating to chemical reactions, specifically focusing on reactants for ATP and NADPH, along with identifying sources for essential elements like hydrogen and oxygen. This form not only promotes active learning but also aids in visualizing the intricate structures and processes fundamental to photosynthesis, making it a vital resource in the field of biology education.
Photosynthesis Diagrams Worksheet Example
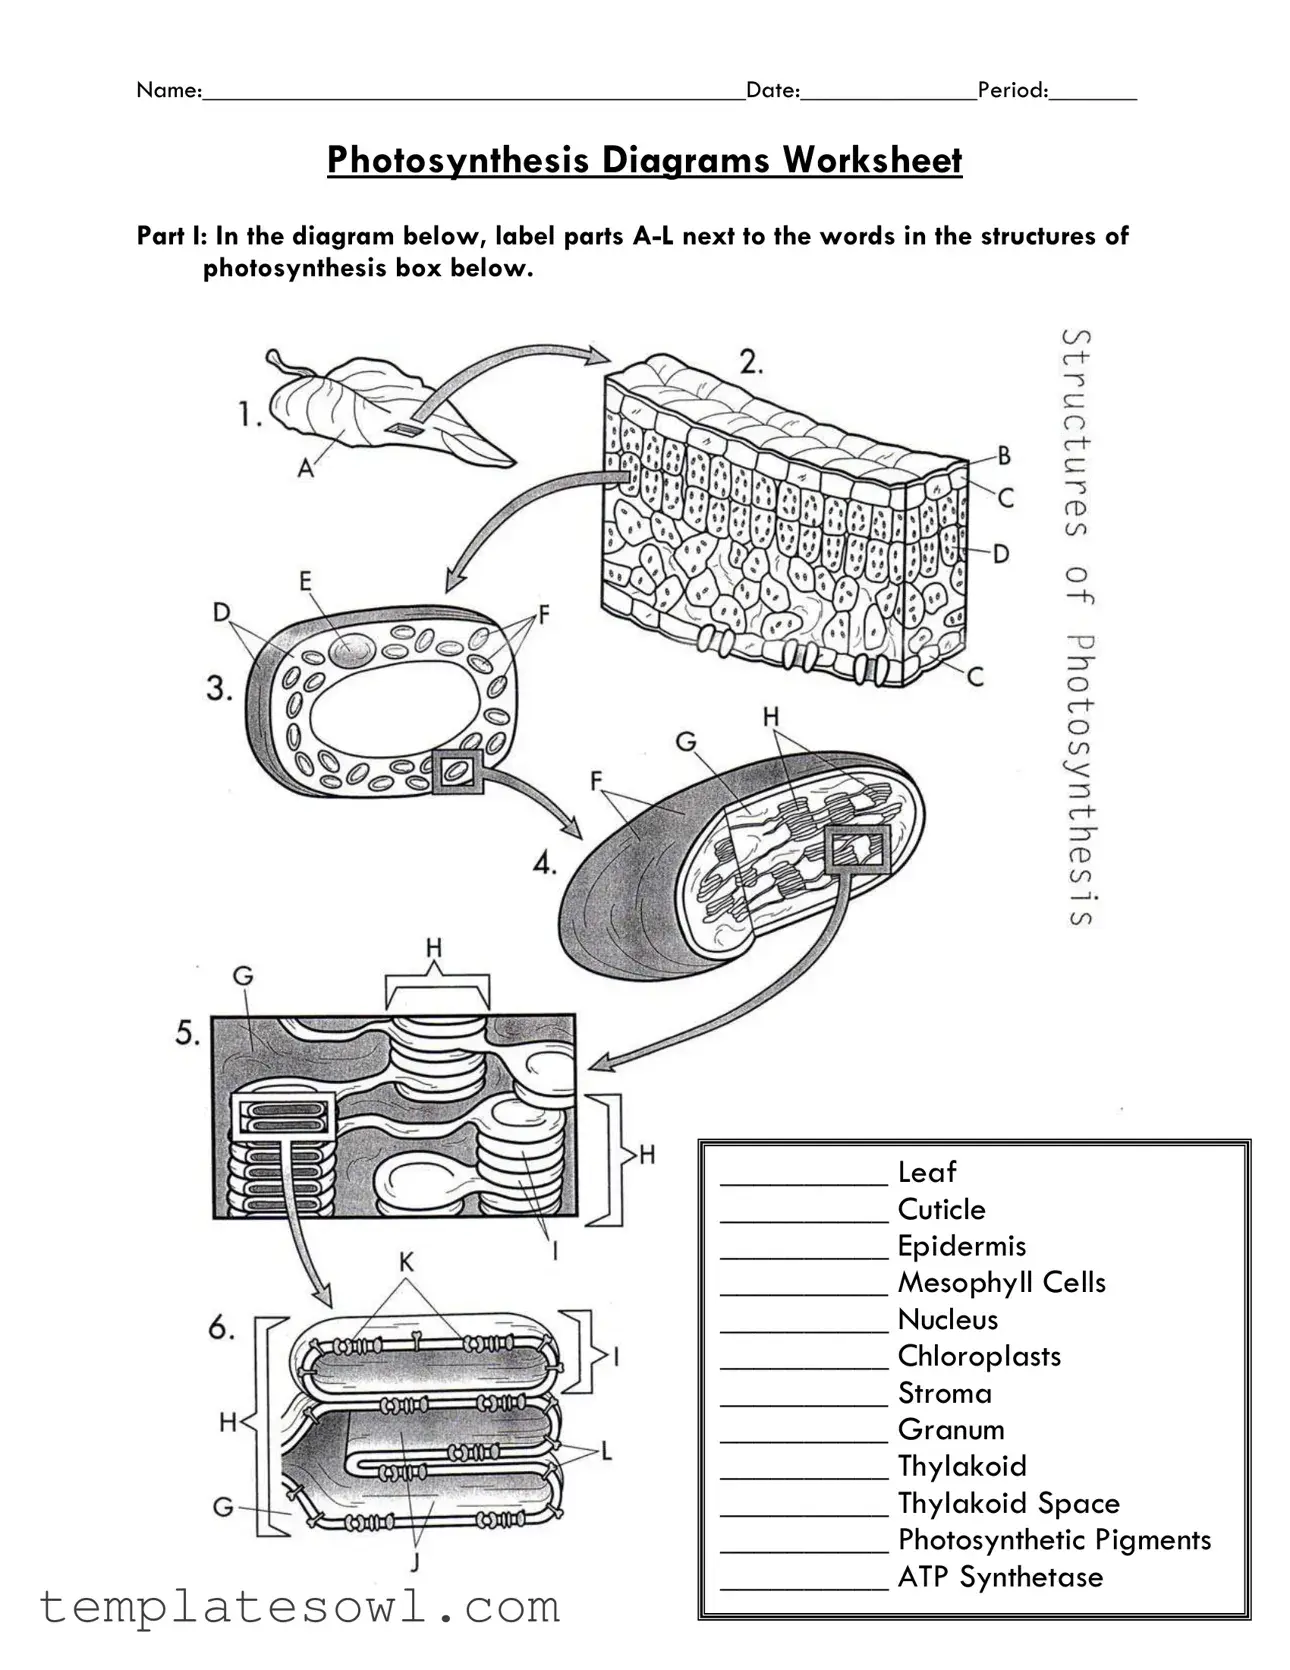
Name:___________________________________________Date:______________Period:_______
Photosynthesis Diagrams Worksheet
Part I: In the diagram below, label parts
__________ Leaf
__________ Cuticle
__________ Epidermis
__________ Mesophyll Cells
__________ Nucleus
__________ Chloroplasts
__________ Stroma
__________ Granum
__________ Thylakoid
__________ Thylakoid Space
__________ Photosynthetic Pigments
__________ ATP Synthetase
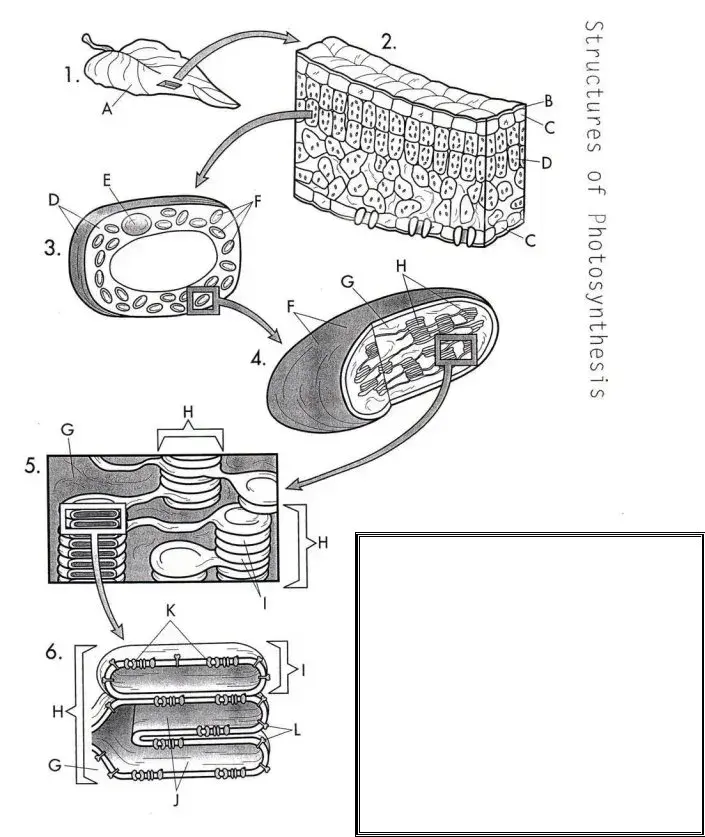
Part II: Use Diagram A to help you label Diagram B. Write labels on the lines in Diagram B.
Diagram A |
|
|
|
|
|
|
|
|
|
|
|
Diagram B |
|
|
|
|
|
|
|
|
|
|
|
|
|
|
|
|
|
|
|
|
|
|
|
|
|
|
|
|
|
|
|
|
|
|
|
|
|
|
|
|
|
|
|
|
|
|
|
|
|
|
|
|
|
|
|
|
|
|
|
|
|
|
|
|
|
|
|
|
|
|
|
|
|
|
|
|
|
|
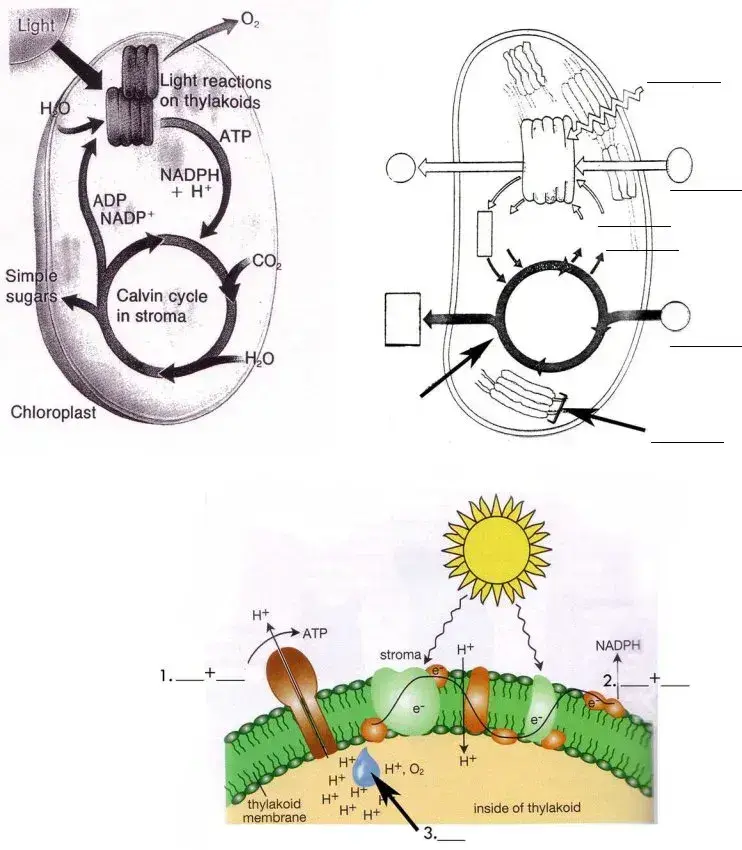
Part III: Label numbers 1, 2, and 3 in the diagram below.
Hint: In number one, you are labeling the reactants for ATP. In number 2, you are labeling the reactants for NADPH. In number 3, you are labeling the source of H and O.
Form Characteristics
| Fact Name | Description |
|---|---|
| Worksheet Name | This is called the Photosynthesis Diagrams Worksheet, which focuses on photosynthesis processes. |
| Purpose | The worksheet is designed to help students learn and label key components related to photosynthesis. |
| Parts of the Worksheet | The worksheet contains three parts that require students to label various diagrams related to photosynthesis. |
| Visual Learning | Using diagrams enhances visual learning, allowing students to connect words and concepts with actual images. |
| Multiple Labels | Students will label parts A-L in the first section based on their understanding of photosynthesis structures. |
| Reactants Identification | Part III quizzes students on identifying key reactants needed for energy production in plants. |
| Educational Value | This worksheet promotes critical thinking and reinforces the connections between structure and function in biological processes. |
Guidelines on Utilizing Photosynthesis Diagrams Worksheet
Completing the Photosynthesis Diagrams Worksheet is a straightforward process, and following the steps carefully will ensure accuracy in your labels. The form requires you to identify and label various components of photosynthesis. Take your time and refer to the diagrams provided to help you make the correct associations.
- Write your Name in the designated space at the top of the worksheet.
- Fill in the Date next to your name.
- Indicate your Period in the space provided.
- In Part I, refer to the structures of photosynthesis box. Label parts A-L in the diagram below, ensuring you match each label carefully to the corresponding structure.
- For Part II, study Diagram A closely. Use it as a reference to help you label Diagram B accurately. Write the labels on the lines provided in Diagram B.
- Move to Part III, where you need to label the three specified areas in the new diagram. For number one, identify and label the reactants for ATP. For number two, label the reactants for NADPH. For number three, indicate the source of H and O.
What You Should Know About This Form
What is the purpose of the Photosynthesis Diagrams Worksheet?
This worksheet aims to deepen the understanding of photosynthesis by visually engaging students with the key components involved in the process. By labeling various parts and structures, learners reinforce their knowledge, making it easier to remember and apply the concepts in future studies.
Who is this worksheet intended for?
The Photosynthesis Diagrams Worksheet is designed primarily for students studying biology, particularly those in middle school or high school. It can also be useful for anyone interested in learning about plant biology and the fundamental processes behind photosynthesis.
How should I complete Part I of the worksheet?
In Part I, you will label parts A-L of the provided diagram using the list of terms. Each term corresponds to a specific structure involved in photosynthesis, such as chloroplasts, thylakoids, and mesophyll cells. Take your time; ensuring accuracy will help you grasp the details of the photosynthesis process.
What do I need to focus on while labeling Diagram B in Part II?
When labeling Diagram B, refer back to Diagram A for guidance. This part encourages you to apply what you learned from the first diagram. It’s important to ensure that your labels are clear and correctly placed to depict the flow of processes in photosynthesis accurately.
Can you explain the significance of the structures labeled in Part I?
Each structure labeled in Part I plays a vital role in the photosynthesis process. For example, the chloroplasts house the components necessary for photosynthesis, while the stroma is where reactions occur. Understanding the function of each part strengthens your overall grasp of how plants convert light energy into chemical energy.
What should I label in Part III of the worksheet?
In Part III, you will be labeling three critical reactants: the substances that combine to form ATP, the reactants for NADPH, and the sources of hydrogen and oxygen. This part of the worksheet reinforces your understanding of the raw materials that plants use during photosynthesis, which is crucial for grasping the entire process.
What strategies can I use to ensure that I thoroughly understand the material?
To ensure a deep understanding, take the time to review your labeled diagrams once they are completed. Discuss the function of each labeled part with classmates or teachers. Additionally, you might want to conduct further research to explore how the labeled structures interact within the photosynthesis process.
Are there any resources available to help me better understand photosynthesis?
Yes, numerous textbooks, online resources, and videos can provide more in-depth information about photosynthesis and its components. Consider looking for visual aids, animations, and interactive diagrams that can bring the concepts to life. Engaging with diverse materials will enhance your comprehension of the subject.
Common mistakes
When filling out the Photosynthesis Diagrams Worksheet form, one common mistake is to leave the name, date, and period section blank. This information is essential for teachers to organize and provide feedback on assignments. Not completing this section can lead to a lack of proper recognition of the student's work.
Another issue arises in Part I of the worksheet. Students often struggle with accurately labeling the components of photosynthesis. For example, labeling may include misspelling terms like "Cuticle" or "Mesophyll Cells." Proper spelling is crucial for clarity and understanding, and errors in terminology can lead to confusion in later discussions or assessments.
Students frequently misidentify parts of the diagram. While they might correctly label the "Chloroplasts," they may overlook key aspects such as the "Thylakoid" or "Grana." This oversight is significant, as each component plays an essential role in the photosynthesis process, and omitting them can lead to gaps in understanding.
In Part II, the instructions ask students to refer to Diagram A while labeling Diagram B. A common mistake is not carefully comparing the two diagrams before attempting to fill out Diagram B. This oversight can result in inaccurate labeling and misunderstanding of the relationships between each part of the diagrams.
In Part III, labeling mistakes often occur concerning the reactants of ATP and NADPH. Students sometimes confuse the order of the reactants or incorrectly identify them altogether. Understanding the significance of these reactants is vital for grasping the photosynthesis process. Failure to accurately label numbers 1, 2, and 3 diminishes overall comprehension.
Another error is not utilizing the provided hints effectively. For instance, the hint for number one emphasizes the need to label the reactants for ATP. Students may overlook this hint, leading to incorrect answers. Hints are designed to assist in understanding, so ignoring them can hinder performance.
Students often neglect to check their work once they complete the worksheet. Reviewing labels after filling them in is an important step. Without this final check, simple mistakes such as incorrect labeling, spelling errors, or unclear handwriting can persist, affecting the overall quality of the work submitted.
Additionally, failing to use clear and legible handwriting is a common mistake. If labels cannot be easily read, it can lead to confusion when assessed by teachers. Neat handwriting enhances clarity and ensures that the information is communicated effectively.
In summary, students make several mistakes when completing the Photosynthesis Diagrams Worksheet. These include leaving key information blank, spelling errors, misidentification of parts, and failing to utilize hints. Moreover, neglecting to review completed work and poor handwriting can further detract from the assignment's clarity and effectiveness.
Documents used along the form
When diving into the subject of photosynthesis, various forms and documents often accompany worksheets to enhance the learning experience. These documents may serve to clarify, assess, or expand upon the concepts being taught. Here’s a useful list of forms commonly used alongside the Photosynthesis Diagrams Worksheet.
- Photosynthesis Vocabulary List: This document provides key terms and definitions related to photosynthesis. Understanding vocabulary is essential for students to grasp the scientific concepts fully.
- Lab Report Template: Students use this template to document their findings from experiments related to photosynthesis. A clear structure helps convey results effectively.
- Photosynthesis Concept Map: A visual representation of the relationships between the different components of photosynthesis. This diagram aids in understanding complex interactions.
- PowerPoint Presentation: A presentation summarizing crucial aspects of photosynthesis. Teachers can utilize this to engage students and provide a visual learning experience.
- Assessment Rubric: This tool outlines expectations for students' performance on photosynthesis assignments. It helps students understand how their work will be evaluated.
- Interactive Quiz: A quiz designed to test students’ knowledge of photosynthesis in a dynamic format. It offers immediate feedback and enhances retention of the material.
- Discussion Questions: A list of thought-provoking questions that encourage classroom discussion. These questions deepen understanding and stimulate critical thinking.
- Student Reflection Form: Allows students to reflect on their learning process and how they approached the worksheet. Self-assessment fosters a deeper understanding.
These documents collectively enhance comprehension and provide varied avenues for engagement with the topic. Students can leverage these resources for a more rounded learning experience, ultimately building a solid foundation in understanding photosynthesis.
Similar forms
The Photosynthesis Diagrams Worksheet form serves as an educational tool, helping students understand the process of photosynthesis through diagrams and labels. Several other documents share a similar structure and purpose. Here are six of them:
- Cell Structure and Function Worksheet: This document includes diagrams of various cell types, prompting students to label different organelles, much like the parts in the Photosynthesis Diagrams Worksheet.
- Human Anatomy Labeling Activity: Similar to the photosynthesis worksheet, this activity allows students to label parts of the human body in a diagram, fostering understanding of anatomical structures.
- Ecological Relationships Diagram: In this worksheet, students label components of ecosystems, such as producers, consumers, and decomposers, akin to labeling parts of the photosynthesis diagrams.
- Life Cycle of a Frog Worksheet: Like the photosynthesis worksheet, this document features a diagram that students label to depict the various stages of a frog’s life cycle, enhancing their learning through visual aids.
- Weather Patterns and Systems Worksheet: This worksheet includes charts and diagrams for labeling weather elements, paralleling the labeling aspect found in the Photosynthesis Diagrams Worksheet.
- DNA Structure and Function Worksheet: In this document, students label parts of a DNA molecule, similar to how they label components involved in the photosynthesis process.
Dos and Don'ts
Filling out the Photosynthesis Diagrams Worksheet can be an enriching experience, one that fosters understanding and engagement with biological processes. To ensure you complete the form effectively, adhere to the following list of dos and don'ts:
- Do write your name, date, and period clearly at the top of the worksheet.
- Do carefully examine Diagram A before labeling Diagram B to ensure accuracy.
- Do use pencils or erasable pens for labeling, allowing for corrections if necessary.
- Do take your time to think about each part and its function in photosynthesis.
- Don't rush through the labeling sections; attention to detail is key.
- Don't ignore the hints provided in the worksheet—especially for Parts II and III.
- Don't use markers or anything that cannot be erased, as mistakes may occur.
- Don't skip labeling any parts; every element is important for understanding the process.
Misconceptions
There are several misconceptions regarding the Photosynthesis Diagrams Worksheet. Understanding these misconceptions can enhance comprehension of the material.
- Misconception 1: The worksheet is only for advanced students.
- Misconception 2: The diagrams are optional and can be skipped.
- Misconception 3: All parts of the worksheet are equally easy.
- Misconception 4: The diagram in Part I is identical to Part II.
- Misconception 5: Once completed, the worksheet requires no further review.
This worksheet is suitable for a wide range of student levels. It is designed to reinforce basic concepts about photosynthesis, making it accessible even for beginners.
The diagrams are integral to the learning process. They provide visual representation, which helps students grasp the complex processes involved in photosynthesis.
The difficulty varies among different sections. Some students may find labeling parts of the diagrams straightforward, while others may struggle with understanding the functions associated with each part.
The diagrams serve different purposes. Part I focuses on labeling individual components, while Part II requires students to apply their understanding by relating the components to a different diagram.
Reviewing the worksheet is crucial. Reinforcement of labeled diagrams and concepts can aid retention and deepen understanding of photosynthesis.
Key takeaways
Completing the Photosynthesis Diagrams Worksheet can be a valuable learning experience. The following points will help guide you through the process effectively.
- The worksheet has three distinct parts, each focusing on different aspects of photosynthesis.
- Begin with Part I, where you will label the components of photosynthesis. This section helps reinforce your understanding of the leaf structure and its functions.
- In Part II, you will compare Diagram A and Diagram B. This part encourages you to visualize how different parts of the photosynthesis process interact with each other.
- Be mindful when transferring labels from Diagram A to Diagram B. Accuracy is key, as this will enhance your overall comprehension.
- Part III includes labeling specific reactants. Familiarizing yourself with the roles of ATP and NADPH is essential in this section.
- Take your time and double-check your work. A thorough understanding of these concepts will greatly aid your studies in biology.
Browse Other Templates
Motor Vehicle Maine - Identify the first lienholder if there is financing involved.
State Farm B2b Claims - List the name of the vehicle owner.