Fill Out Your Quest Diagnostics Specimen Tubes Form
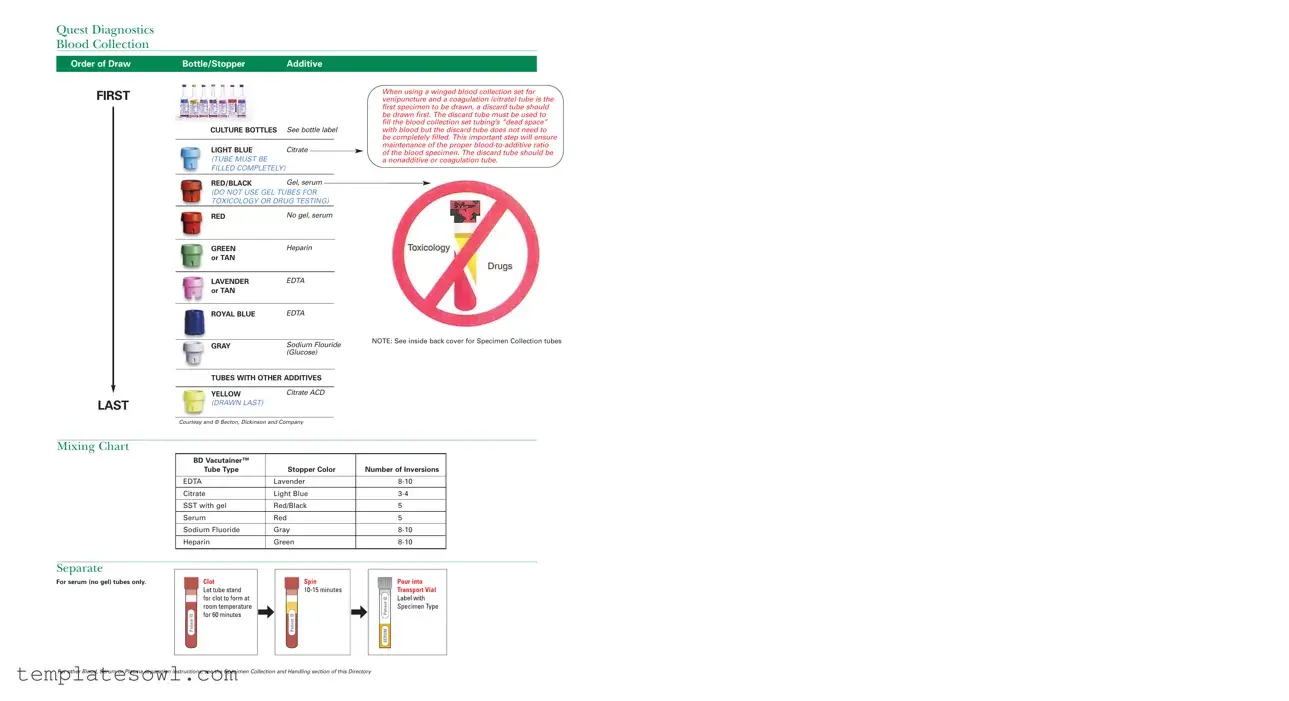
The Quest Diagnostics Specimen Tubes form plays a crucial role in ensuring the accuracy and reliability of laboratory test results. Understanding the order in which different specimen tubes should be filled is essential for proper sample collection. Starting with culture bottles, which are clearly labeled, the form outlines a series of colored tubes designed for specific purposes. For instance, the light blue tube contains citrate and must be filled completely, while the red/black tube is filled with gel but should be avoided for toxicology or drug testing. Other tubes, like the green tube with heparin and the lavender tube with EDTA, are vital for various tests as well. The importance of using a discard tube before drawing blood into a coagulation tube cannot be overstated; it helps clear any 'dead space' in the blood collection set and maintains the appropriate blood-to-additive ratio. Furthermore, the form includes important notes on the number of inversions required for each tube type to mix additives effectively. Adhering to these detailed instructions is critical for obtaining high-quality specimens, which ultimately leads to accurate diagnostic outcomes.
Quest Diagnostics Specimen Tubes Example
Quest Diagnostics Blood Collection
Order of Draw |
Bottle/Stopper |
Additive |
FIRST
CULTURE BOTTLES |
See bottle label |
|
LIGHT BLUE |
Citrate |
|
|
||
(TUBE MUST BE |
|
|
FILLED COMPLETELY) |
|
|
RED/BLACK |
Gel, serum |
|
(DO NOT USE GEL TUBES FOR TOXICOLOGY OR DRUG TESTING)
RED |
No gel, serum |
|||
|
|
|
|
|
GREEN |
Heparin |
|||
or TAN |
|
|
|
|
|
|
|
|
|
LAVENDER |
EDTA |
|||
or TAN |
|
|
|
|
|
|
|
||
ROYAL BLUE |
EDTA |
|||
|
|
|
||
GRAY |
Sodium Flouride |
|||
|
(Glucose) |
|||
When using a winged blood collection set for venipuncture and a coagulation (citrate) tube is the first specimen to be drawn, a discard tube should be drawn first. The discard tube must be used to fill the blood collection set tubing’s “dead space” with blood but the discard tube does not need to be completely filled. This important step will ensure maintenance of the proper
NOTE: See inside back cover for Specimen Collection tubes
TUBES WITH OTHER ADDITIVES
LAST
YELLOW |
Citrate ACD |
(DRAWN LAST) |
|
Courtesy and © Becton, Dickinson and Company
Mixing Chart
BD Vacutainer™ |
|
|
Tube Type |
Stopper Color |
Number of Inversions |
|
|
|
EDTA |
Lavender |
|
|
|
|
Citrate |
Light Blue |
|
|
|
|
SST with gel |
Red/Black |
5 |
|
|
|
Serum |
Red |
5 |
|
|
|
Sodium Fluoride |
Gray |
|
|
|
|
Heparin |
Green |
|
|
|
|
Separate
For serum (no gel) tubes only.
For other Blood, Serum or Plasma separation instructions, see the Specimen Collection and Handling section of this Directory
Form Characteristics
| Fact Name | Description |
|---|---|
| Order of Draw | The order in which blood collection tubes should be filled is crucial for accurate testing. Typically, the first tube drawn is a culture bottle, followed by light blue, red/black, and other color-coded tubes as specified. |
| Citrate Tube Requirement | Light blue tubes contain citrate and must be filled completely to ensure proper coagulation testing. |
| Gel Tube Restrictions | Red/black gel tubes should not be used for toxicology or drug testing as they may interfere with the results. |
| Heparin and EDTA Tubes | Green tubes contain heparin while lavender or royal blue tubes contain EDTA, all of which are used for specific types of blood tests. |
| Discard Tube Importance | Use a discard tube before the citrate tube when using a winged blood collection set. This step ensures a proper blood-to-additive ratio in the subsequent test tubes. |
| Mixing Instructions | Each tube type has specific mixing requirements. For example, light blue tubes should be inverted 3-4 times, while lavender and gray tubes require 8-10 inversions. |
| Last Drawn Tube | Yellow citrate ACD tubes are to be drawn last to avoid contamination and ensure accurate results. |
| Separation Instructions | For serum (no gel) tubes, specific instructions for separation are provided in the Specimen Collection and Handling section, important for preserving sample integrity. |
Guidelines on Utilizing Quest Diagnostics Specimen Tubes
Filling out the Quest Diagnostics Specimen Tubes form is straightforward. It’s important to accurately record the necessary information to ensure proper handling and processing of your specimens. Follow these steps to complete the form efficiently.
- Start with your personal information. Enter your full name, date of birth, and contact details at the top of the form.
- Provide the name of the healthcare provider or facility requesting the test. This helps identify who ordered the specimen collection.
- List the specific tests you are requesting. Refer to the test codes, if applicable, to avoid any confusion.
- Indicate the date and time of the specimen collection. This information is crucial for lab analysis.
- Note the order of draw for the specimen tubes. Follow the guidelines to ensure proper blood collection sequence:
- First: Culture bottles
- Second: Light Blue (Citrate)
- Third: Red/Black (Gel, serum)
- Fourth: Red (No gel, serum)
- Fifth: Green (Heparin)
- Sixth: Lavender (EDTA)
- Seventh: Gray (Sodium Fluoride)
- For the discard tube, write down that a non-additive or coagulation tube should be used before the light blue tube if it’s the first specimen drawn.
- Finally, review the completed form for accuracy. Make sure everything is filled out correctly before submission.
Once the form is filled out, it should be ready to accompany your specimen to Quest Diagnostics for processing. Having completed everything accurately helps ensure a smoother experience for you and the lab technicians handling your samples.
What You Should Know About This Form
What is the correct order of draw for blood collection using Quest Diagnostics specimen tubes?
The order of draw is important to avoid contamination of samples and ensure accurate test results. When collecting blood, the first tube should generally be a culture bottle, followed by a light blue tube, which contains sodium citrate. After that, use red/black gel tubes or red serum tubes, followed by green tubes that contain heparin. You can then collect lavender tubes containing EDTA and finally gray tubes with sodium fluoride. If a coagulation tube (light blue) is the first specimen drawn, a discard tube should be used first. This helps to fill the “dead space” in the blood collection set, ensuring the proper blood-to-additive ratio.
Why is it necessary to use a discard tube when using a winged blood collection set?
Using a discard tube is crucial when the first specimen drawn is a coagulation tube, such as the light blue tube. This step helps to eliminate any air that may be present in the blood collection set tubing. By filling this “dead space” with blood, you help maintain the proper blood-to-additive ratio, which is essential for accurate test results. The discard tube does not need to be completely filled, but it must be used to ensure that subsequent specimens are not affected by air or contamination.
Can I use gel tubes for toxicology or drug testing?
No, it is not recommended to use gel tubes (red/black) for toxicology or drug testing. These tests require a clear serum sample without any additives that could interfere with the analysis. Therefore, red serum tubes without gel should be utilized for these types of testing. It’s important to adhere to these guidelines to ensure the integrity of the tests being conducted.
What are the mixing instructions for each type of Quest Diagnostics specimen tube?
Proper mixing of specimen tubes is essential for uniformity of the sample. For each tube type, specific numbers of inversions are required. For instance, the lavender EDTA tube should be inverted 8 to 10 times, while the light blue citrate tube should be inverted 3 to 4 times. Red/black gel tubes and red serum tubes need to be inverted 5 times each. Green heparin tubes also require 8 to 10 inversions, while the gray sodium fluoride tube should be inverted 8 to 10 times. Following these mixing instructions ensures that the additives mingle appropriately with the blood, which is vital for accurate test results.
Common mistakes
Completing the Quest Diagnostics Specimen Tubes form accurately is essential for ensuring proper testing and reliable results. However, mistakes do occur. One common error is not filling the citrate tube completely. This step is crucial because an improperly filled tube can affect the blood-to-additive ratio, leading to inaccurate test results. It is important to be diligent about ensuring that the light blue citrate tube reaches the fill line.
Another frequent mistake involves the order of draw. Failing to draw samples in the correct sequence can lead to contamination. For instance, culture bottles should be the first specimens drawn, followed by the light blue citrate tube. The importance of using a discard tube when starting with a coagulation tube cannot be overstated; doing so minimizes the chance of contamination.
Using the wrong type of tube for specific tests also presents a significant risk. Many people mistakenly select gel tubes for toxicology or drug testing. This misstep could undermine the validity of the tests performed. Hence, it's crucial to refer to the guidelines and understand which tube types are appropriate for different tests.
Mixing up the inversion counts is another error that can compromise results. Different tubes require a specific number of inversions after collection to adequately mix the blood with the additive. For example, the lavender EDTA tube requires 8-10 inversions, while the light blue citrate tube only requires 3-4. Neglecting this step can result in clot formation or inadequate mixing of the specimen.
Additionally, an incorrect selection of discard tubes occurs more frequently than one might believe. While the discard tube does not need to be completely filled, it needs to be a non-additive or coagulation tube to ensure proper function. Using an additive tube as a discard may lead to inaccuracies in subsequent tests.
Lastly, overlooking specific separation instructions can hinder the process. For serum tubes without gel, proper separation instructions must be followed, particularly relevant for precise analysis of the results. It's crucial to consult the Specimen Collection and Handling section for these specific guidelines.
Documents used along the form
The proper handling and collection of blood specimens is essential for accurate testing and diagnosis. Along with the Quest Diagnostics Specimen Tubes form, several other important documents help ensure compliance and proper procedures during specimen collection. Below is a list of related forms and documents commonly utilized in tandem with the Quest Diagnostics form.
- Patient Requisition Form: This document provides essential patient information and details about the tests required. It verifies that the laboratory has the correct data before processing specimens.
- Specimen Collection Guidelines: A set of instructions outlining the proper techniques and equipment needed for collecting various types of specimens, ensuring quality and reliability in testing.
- Quality Control Log: This document records the quality control measures implemented during specimen collection and handling. It helps maintain laboratory standards and traceability of procedures.
- Laboratory Processing Form: Used by laboratory technicians, this form tracks each specimen after collection, noting the tests performed and any relevant observations during processing.
- Transport Log: This form documents the transportation details of specimens to the lab. It ensures that specimens are moved under proper conditions to prevent degradation and inaccuracies.
Attention to each of these documents is crucial in maintaining the integrity of blood specimen collection and ensuring that accurate results are obtained. Proper documentation supports the overall workflow within healthcare settings and enhances patient care.
Similar forms
-
Blood Collection Manual: Similar to the Quest Diagnostics Specimen Tubes form, this manual provides detailed instructions on the proper techniques for blood collection, including the order of draw for different tubes, ensuring accurate results.
-
Laboratory Test Requisition Form: This form is used to request specific tests on collected specimens. Like the Specimen Tubes form, it details required specimens and any special handling instructions.
-
Chain of Custody Form: This document ensures the integrity and traceability of a specimen. It shares similarities with the Specimen Tubes form in that it outlines how a specimen must be handled throughout testing.
-
Patient Consent Form: Just as the Specimen Tubes form often requires patient information, the consent form ensures patients agree to have their blood collected and tested, highlighting their rights in the process.
-
Specimen Transport Form: This document tracks the transportation of specimens from collection to the lab, resembling the Specimen Tubes form in that it emphasizes proper handling to maintain specimen integrity.
-
Laboratory Protocol Guidelines: These guidelines outline best practices for specimen handling, including mixing instructions that mirror those found in the Specimen Tubes form, ensuring accurate and reliable test outcomes.
-
Blood Bank Collection Form: This form is specific to blood bank procedures but is similar in that it details how to collect, label, and store blood specimens efficiently and safely.
-
Biopsy Collection Instructions: Like the Specimen Tubes form, these instructions provide specific handling and processing requirements for biopsy samples, ensuring accuracy for diagnostic testing.
-
Pathology Request Form: This form, much like the Specimen Tubes form, includes necessary details for tissue specimens, specifying how they should be collected and processed for lab analysis.
-
Quality Control Log: This document tracks the quality of specimens and testing procedures. It relates closely to the Specimen Tubes form as it focuses on maintaining standards for accurate test results.
Dos and Don'ts
When completing the Quest Diagnostics Specimen Tubes form, there are essential guidelines to follow. Knowing what to do can enhance the accuracy of your specimen collection, while avoiding common mistakes can save time and resources.
- Do: Fill each tube completely, especially the light blue citrate tube, to maintain the required blood-to-additive ratio.
- Do: Use a discard tube before drawing the first specimen with a winged blood collection set, ensuring that the tubing’s dead space is filled.
- Do: Label each tube clearly and accurately after specimen collection to prevent mix-ups later on.
- Do: Follow the specific order of draw, starting with culture bottles and ending with tubes containing citrate ACD.
- Don't: Use gel tubes for toxicology or drug testing, as this can compromise test results.
- Don't: Skip the mixing steps. Ensure that you invert the tubes as indicated to properly mix the additive with the blood.
- Don't: Leave any tubes unsealed or improperly labeled, as this can lead to contamination or misidentification.
- Don't: Forget to refer to the Specimen Collection and Handling section for additional instructions on blood, serum, or plasma separation.
Misconceptions
Misconceptions about the Quest Diagnostics Specimen Tubes form can lead to confusion during blood draws. Here are nine common misunderstandings:
- All tubes must be filled completely. Many believe every tube needs to be completely full. However, only the citrate tube must be filled completely; other tubes may not require this.
- The order of draw isn’t important. Some think the order in which tubes are filled doesn’t matter. In reality, following the correct order minimizes contamination and preserves test accuracy.
- Any tube can be used for toxicology tests. There's often a belief that all tubes are interchangeable. Gel tubes should not be used for toxicology or drug testing, as they may interfere with results.
- Only one discard tube is needed for any procedure. Many might assume that one discard tube is sufficient for all situations. In fact, the discard tube is essential when using specific equipment or when drawing certain types of blood tests.
- The discard tube must be filled completely to be effective. It is commonly thought that the discard tube must be completely full. Instead, it only needs to fill the "dead space" of the collection set tubing.
- Mixing instructions are the same for all tubes. Some assume that all specimen tubes require the same number of inversions. Each type of tube has specific mixing instructions, which are crucial for proper sample preservation.
- Serum and plasma tubes can be treated the same. It's a common misconception that serum and plasma separation methods are identical. They differ in their handling and separation processes.
- The yellow tube is always drawn first. Many might think the yellow tube, which contains ACD, is the priority. However, it is drawn last in the order of draw.
- Any blood collection set can be used with any tube. Some individuals believe that all blood collection sets are universally applicable. Different tests may require specific equipment to ensure accuracy and reliability.
Understanding these misconceptions can help improve the blood collection process and ensure accurate laboratory results.
Key takeaways
When filling out and using the Quest Diagnostics Specimen Tubes form, it’s important to understand some key aspects to ensure accuracy and proper handling of samples. Here are eight essential takeaways:
- Follow the Order of Draw: Adhering to the correct order of draw is crucial. The order minimizes the risk of contamination and ensures that blood specimens are collected correctly.
- Fill Specimen Tubes Completely: Some tubes, like the light blue citrate, must be filled completely to maintain the correct blood-to-additive ratio.
- Use a Discard Tube: When starting with a coagulation tube, always draw a nonadditive or coagulation discard tube first to fill the dead space in the blood collection set.
- Avoid Specific Tubes for Certain Tests: Never use gel tubes for toxicology or drug testing, as this could compromise the test results.
- Mixing Tubes Properly: Each tube type requires a certain number of inversions after collection to ensure proper mixing with additives. Follow the guidelines provided.
- Understand Additive Differences: Familiarize yourself with the additives in different tubes, such as heparin in green tubes and EDTA in lavender tubes, to prevent mix-ups.
- Separate Serum Correctly: Serum tubes without gel should be processed separately, while other blood, serum, or plasma separation instructions should be reviewed in the handling section.
- Consult the Directory: For any uncertainties or additional instructions, refer to the Specimen Collection and Handling section of the Directory, as it provides valuable guidance.
By taking these steps, you can contribute significantly to the integrity of the specimens collected and ultimately support accurate laboratory results.
Browse Other Templates
Petition for Divorce Texas - Instructions are sensitive to the emotional context of divorce proceedings.
NC Tax Objection Form,Request for Review of Tax Assessment,Departmental Review Request Form,Objection to Tax Notice Form,Tax Assessment Appeal Form,Notice Review Request NC-242,Form for Tax Objection Submission,Request for Tax Adjustment Review,Taxpa - Providing a detailed account of objections will strengthen your case.
Form 2790 Self Employment Record - The two-page form provides ample space for documenting various income sources and incurred expenses systematically.