Fill Out Your Trailer Inspection Form
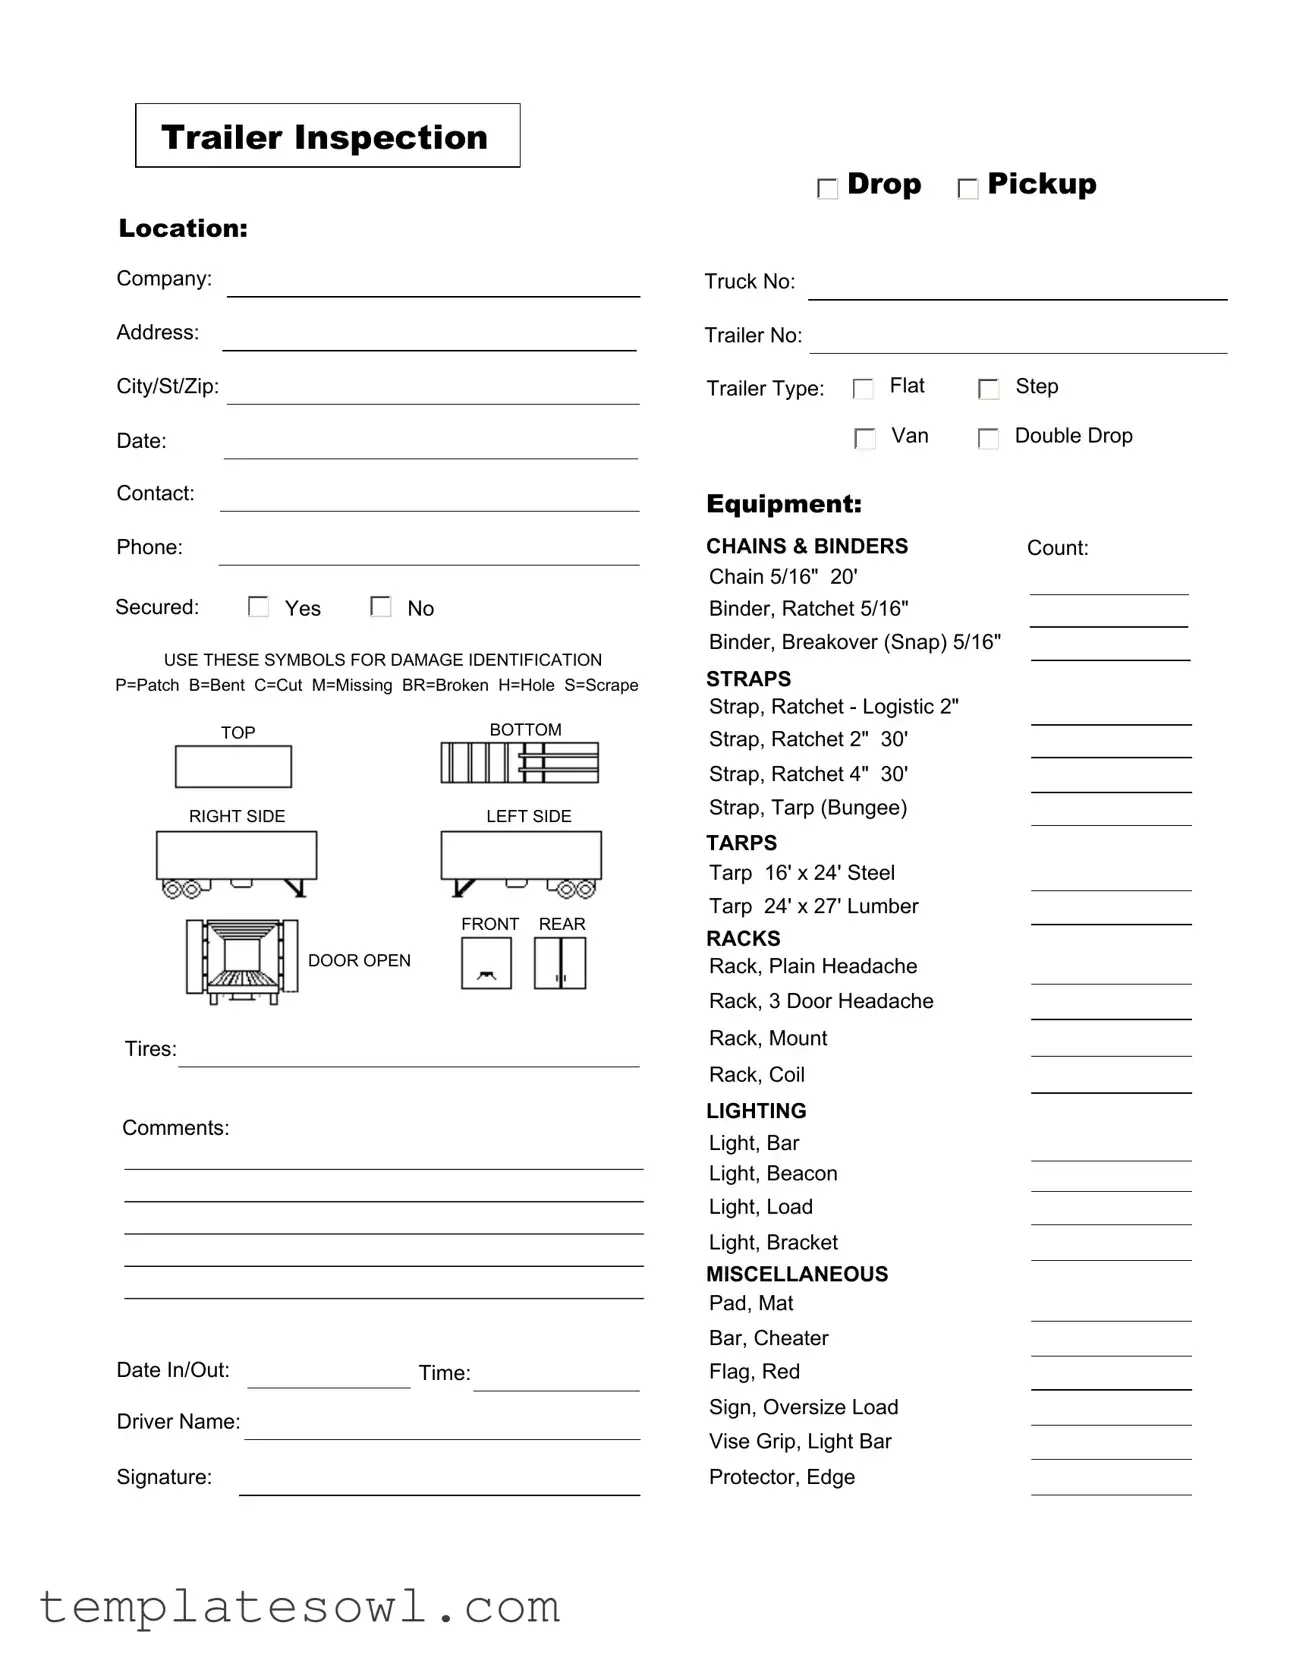
Ensuring safety and compliance with regulations begins with a thorough understanding of the Trailer Inspection form, a crucial tool for anyone involved in the transportation industry. This form captures key details regarding the inspection location, including the drop-off site and pickup company, as well as pertinent contact information. It requires essential identifiers such as truck and trailer numbers, trailer types, and a list of specific equipment present. Through checks on items like tires and securing devices, inspectors can document the condition of the trailer accurately. Damage reporting is facilitated using a unique set of symbols that helps identify issues such as patches, bent parts, cuts, and missing elements, ensuring everyone understands the severity of the damage. Additional sections allow for comments, time tracking, and the driver's information, fostering clear communication. Moreover, the form encompasses details on chains, binders, straps, tarps, lighting, and other miscellaneous equipment, leading to comprehensive safety evaluations. This holistic approach not only aids in maintaining high standards but also promotes proactive measures to address potential hazards on the road.
Trailer Inspection Example
Trailer Inspection
Location:
Drop |
Pickup |
Company:
Address:
City/St/Zip:
Date:
Contact:
Truck No:
Trailer No:
Trailer Type:
Equipment:
Flat
Van
Step
Double Drop
Phone:
Secured: |
Yes |
No |
USE THESE SYMBOLS FOR DAMAGE IDENTIFICATION P=Patch B=Bent C=Cut M=Missing BR=Broken H=Hole S=Scrape
TOPBOTTOM
RIGHT SIDE |
LEFT SIDE |
FRONT REAR
DOOR OPEN
Tires:
Comments:
Date In/Out: |
|
Time: |
|
|
|
Driver Name:
Signature:
CHAINS & BINDERS |
Count: |
|
||
Chain 5/16" 20' |
|
|
|
|
Binder, Ratchet 5/16" |
|
|
|
|
|
|
|
||
Binder, Breakover (Snap) 5/16" |
|
|
|
|
|
|
|
||
STRAPS |
|
|
|
|
|
|
|
|
|
Strap, Ratchet - Logistic 2" |
|
|
|
|
Strap, Ratchet 2" |
30' |
|
|
|
|
|
|
||
Strap, Ratchet 4" |
30' |
|
|
|
|
|
|
||
Strap, Tarp (Bungee)
TARPS
Tarp 16' x 24' Steel
Tarp 24' x 27' Lumber
RACKS
Rack, Plain Headache
Rack, 3 Door Headache
Rack, Mount
Rack, Coil
LIGHTING
Light, Bar
Light, Beacon
Light, Load
Light, Bracket
MISCELLANEOUS
Pad, Mat
Bar, Cheater
Flag, Red
Sign, Oversize Load
Vise Grip, Light Bar
Protector, Edge
Form Characteristics
| Fact Name | Description |
|---|---|
| Inspection Purpose | The Trailer Inspection form is designed to ensure that trailers are safe and roadworthy before being used for transporting goods. |
| Required Information | Essential information includes the location, trailer type, contact details, and damage identification symbols, which help assess the trailer's condition. |
| Governing Laws | In many states, trailer inspections are governed by the Department of Transportation regulations. It is crucial to refer to state-specific laws for compliance. |
| Damage Symbols | The form utilizes specific symbols for damage identification. For instance, 'P' represents a patch, while 'B' denotes a bent section. |
| Equipment Count | In addition to the trailer itself, the form requires a detailed count of chains, binders, straps, tarps, racks, and lights present on the trailer. |
| Signature Requirement | A driver's name and signature are required on the form, indicating their acknowledgment of the trailer's condition and the accuracy of the inspection report. |
Guidelines on Utilizing Trailer Inspection
Completing the Trailer Inspection form is an essential process in ensuring safety and compliance. Once you've gathered the necessary details, you can follow these steps to fill out the form completely and accurately.
- Begin by entering the Trailer Inspection Location. This is where the inspection takes place.
- Fill in the Drop Pickup Company information. This identifies the company associated with the trailer.
- Provide the Address of the drop-off location, ensuring it's clear and complete.
- Next, indicate the City/St/Zip for the location.
- Record the Date of inspection.
- Include the Contact person's name and phone number for follow-up questions.
- Enter details regarding the vehicle by providing Truck No and Trailer No.
- Specify the Trailer Type (e.g., Flat, Van, Step, Double Drop).
- List any relevant Equipment associated with the trailer.
- Indicate whether the trailer is Secured by checking 'Yes' or 'No'.
- Utilize the provided symbols to mark any Damage Identification on the trailer's condition, selecting from options such as Patch (P) or Broken (BR), and placing them in the appropriate boxes (TOP, BOTTOM, etc.).
- Document the condition of the Tires and write any additional Comments regarding the inspection.
- Record the Date In/Out of the trailer inspection.
- Note the Time of inspection for reference.
- Write in the Driver Name who completed the inspection.
- Conclude with the Signature of the driver to validate the inspection.
- For chains and binders, count the number of each type and record them next to CHAINS & BINDERS.
- Include details about STRAPS and the types you have in inventory.
- Document the available TARPS and their dimensions.
- List any RACKS associated with the trailer.
- Lastly, specify the types of LIGHTING available on the trailer.
- If any other items are relevant, note them under MISCELLANEOUS.
What You Should Know About This Form
What is the purpose of the Trailer Inspection form?
The Trailer Inspection form serves as a detailed record of the condition and equipment of a trailer before it is used. It helps ensure that all trailers are safe for transportation and meet the necessary standards for operation.
What information do I need to fill out on the form?
You will need to provide details such as the trailer inspection location, pickup company, address, date, contact information, truck and trailer numbers, type of trailer, and equipment on board. Make sure to also include the driver’s name and signature.
How do I indicate damage on the Trailer Inspection form?
The form includes specific symbols for identifying damage, such as 'P' for Patch, 'B' for Bent, 'C' for Cut, 'M' for Missing, 'BR' for Broken, 'H' for Hole, and 'S' for Scrape. Use these symbols in the designated sections to clearly indicate any damages found during the inspection.
What should I do if I find damage during the inspection?
If you discover any damage, it is crucial to document it on the form using the provided symbols. Then, communicate this information to the relevant personnel for assessment and necessary repairs before the trailer is put into use.
What should I enter in the 'Tires' section?
In the 'Tires' section, provide comments about the condition of the tires. Note any issues such as wear, damage, or inflation problems. This information is vital for ensuring safe towing.
What types of equipment should I count on the form?
You should include all relevant equipment, such as chains, binders, straps, tarps, and lighting. Be sure to count each item carefully to ensure that all necessary equipment is available and in good condition.
How do I record the date and time on the form?
Fill in the 'Date In/Out' section with the relevant dates for when the trailer is taken for inspection and when it is returned. For the time, record when the inspection starts and when it ends. Accurate records help maintain tracking and accountability.
Why is the driver's signature important?
The driver's signature verifies that the inspection was conducted and that the information provided is accurate. This signature confirms that the driver acknowledges the trailer's condition and any issues that have been documented.
Common mistakes
Filling out the Trailer Inspection form accurately is crucial for ensuring safety and compliance. One common mistake is neglecting to provide complete contact information. Omitting details such as the contact name or phone number can lead to communication issues later. Always double-check that this section is fully filled out, including the company name and address. Missing this information can create confusion and delays in assessing the inspection results.
Another frequent error occurs in the damage identification section. People often use the symbols incorrectly or fail to mark any damages at all. It's important to follow the provided symbols closely, such as using "P" for patches or "BR" for broken components. Additionally, users should thoroughly inspect all areas of the trailer, including the top, bottom, front, and rear, to ensure no issues are overlooked. Noting the condition accurately prevents future safety hazards and keeps everyone accountable.
Many individuals also struggle with documenting insufficient comments regarding the trailer's condition. This section offers an opportunity to elaborate on any observed issues or to explain repairs that have been made. Failing to add detailed comments can result in misunderstandings about the trailer's state and lead to problems down the road. Always provide context in the comments section to give a clearer picture of the trailer’s condition.
Finally, neglecting the date and time of the inspection can cause record-keeping issues. This crucial information helps track maintenance and inspections over time. Ensure that the date in/out and the time fields are completed accurately. Skipping these details can lead to challenges in organizing maintenance records, which are essential for compliance and safety evaluations.
Documents used along the form
The Trailer Inspection form serves as a crucial tool in ensuring the safety and compliance of transportation equipment. However, it often works in tandem with various other forms and documents that complement its purpose. Each of these documents plays a distinct role in the overall inspection and maintenance process, streamlining operations and safeguarding both drivers and cargo.
- Vehicle Maintenance Log: This document details the scheduled maintenance and repair history of the trailer. It helps to track the upkeep of the vehicle, ensuring that all necessary checks are completed and recorded over time.
- Bill of Lading: A vital shipping document that provides proof of the contract between the shipper and carrier. It includes details about the cargo being transported, making it essential for accurate record-keeping and accountability during transit.
- Pre-Trip Inspection Checklist: Before embarking on a journey, drivers typically perform a pre-trip inspection, documented with this checklist. It outlines key safety features to verify, such as lights, brakes, and tires, enhancing the safety of the haul.
- Accident Report Form: Should an unfortunate incident occur, this form is used to document the details of an accident involving the trailer. Gathering this information is imperative for liability purposes and to settle any related disputes.
- Driver Qualification File: This file contains essential information about the driver’s qualifications and history. It includes documentation such as licenses, certifications, and training records, ensuring compliance with regulatory requirements.
Together, these documents create a comprehensive framework for trailer management, contributing to the vehicle's operational integrity. By utilizing these forms in conjunction with the Trailer Inspection form, transportation companies can foster safety, efficiency, and accountability in their operations.
Similar forms
The Trailer Inspection form shares similarities with several other documents related to vehicle and equipment inspections. Here are five such documents:
- Vehicle Inspection Report: This document outlines a detailed inspection of a vehicle’s condition. It includes sections for the vehicle identification, date of inspection, and any issues identified, much like the Trailer Inspection form. Both documents ensure that an inventory of the condition is maintained.
- Forklift Inspection Checklist: Similar to the Trailer Inspection form, this checklist covers various parts of a forklift, including safety features and any necessary maintenance. The format is structured to allow for easy indication of defects and operational readiness.
- Pre-Trip Inspection Form: Before a journey, drivers complete this form to verify the safety and functionality of their vehicle. Like the Trailer Inspection form, it emphasizes the importance of identifying potential issues before they lead to accidents.
- Equipment Maintenance Log: This document keeps track of the maintenance history of equipment, noting repairs and inspections performed. It aligns closely with the Trailer Inspection form by providing a record of observed conditions and needed repairs.
- Logbook for Commercial Drivers: In this logbook, drivers record their hours of service, vehicle details, and any inspections conducted. It parallels the Trailer Inspection form as both focus on compliance and safety in the operation of heavy vehicles.
Dos and Don'ts
When filling out the Trailer Inspection form, it is essential to adhere to certain guidelines to ensure accuracy and completeness. Here is a list of things you should and should not do:
- Do fill in all required fields, such as the trailer number and date.
- Do use clear and legible handwriting when completing the form.
- Do identify any damage using the provided symbols for clarity.
- Do ensure all contact information is up to date and accurate.
- Do sign the form to validate the inspection performed.
- Don’t leave any sections blank that require your input.
- Don’t use abbreviations or unclear symbols when noting damage.
- Don’t scribble or make alterations that obscure information.
- Don’t forget to double-check the form for any errors before submission.
- Don’t neglect to keep a copy of the completed form for your records.
Misconceptions
Misconceptions about the Trailer Inspection form can lead to unnecessary confusion and mismanagement. Below are some common myths clarified for better understanding.
- All trailers require a full inspection every time they are used. Many people think that a complete inspection is mandatory for every trip. In reality, the form is meant for periodic checks and inspections based on specific regulatory guidelines.
- The Trailer Inspection form is only for commercial vehicles. While the form is primarily used by businesses, personal trailers also benefit from regular inspections. This helps ensure safety for all road users.
- Inspecting a trailer is a quick process that requires no training. Some assume that anyone can complete the inspection without preparation. However, understanding the components and signs of damage takes knowledge and experience.
- Damage identification symbols are universal. People may believe that the symbols (like P, B, and C) are intuitive. This is not true; everyone using the form must be familiar with these specific symbols to communicate effectively.
- Moisture or dirt on the trailer doesn't need to be noted. Some ignore minor issues during inspections. However, documenting all conditions, including moisture or dirt accumulation, is important for maintaining the trailer’s integrity.
- The Trailer Inspection form is only necessary for larger trailers. This misconception overlooks the fact that even small trailers can present risks. Regular inspections help safeguard against problems, regardless of the size.
- The Inspection form does not need to be retained. Many think that once the inspection is complete, there’s no need to keep a record. In reality, retaining these forms can be critical for legal compliance and for tracking maintenance over time.
Key takeaways
Filling out the Trailer Inspection form is a crucial part of ensuring that vehicles are safe and ready for use. Here are some key takeaways to keep in mind:
- The form should always be completed in full, providing accurate information about the trailer, including the location, company, and contact details.
- Identify the trailer type and equipment clearly. This helps in categorizing the trailer correctly for inspections.
- Utilize the damage identification symbols effectively. These symbols clarify the condition of the trailer, making it easier for others to understand any issues.
- Pay special attention to the tire condition. Tires are essential for safe travel, and comments about their status can reveal crucial information.
- Make sure to note the date and time of the inspection. This provides a record of when maintenance was last performed or when problems were first identified.
- Ensure all chains and binders are counted accurately. This includes the size and type, which is vital for securing loads properly.
- Check lighting equipment thoroughly. Functioning lights are necessary for safety on the road and should be noted on the form.
- Don’t overlook miscellaneous items. These can include everything from pads to flags, and their condition can impact safety and compliance.
Being thorough and diligent when completing the form can significantly enhance safety and operational efficiency. Always remember that proper documentation helps prevent issues down the line.
Browse Other Templates
Vehicle Maintenance Record Template - Gain insights into your vehicle's engine performance.
LLC Amendments Form,Oklahoma LLC Update Document,Articles of Organization Amendment,Public Benefit LLC Amendment,LLC Name Change Application,Oklahoma Business Structure Revision,Form for Amending LLC Articles,Oklahoma Limited Liability Company Amendm - The form may be used for various types of amendments, not just the name change.
Heroin - List children from your current relationship.