
Fill Out Your Yardi Manual Form
The Yardi Manual form is a vital resource for property managers and finance teams handling accounts payable within the Yardi Voyager platform. It serves as a comprehensive guide to efficiently manage a variety of functions related to vendor management and payment processing. From setting up new vendors and conducting vendor lookups to managing invoice entries and generating payables batches, the form covers essential procedures that facilitate streamlined financial operations. The guide details the steps involved in reviewing vendor information, adding new vendors, checking for duplicates, and utilizing various filters for quick searches. It also provides insight into creating payables batches, processing checks, and handling exceptions like batch errors or reversing transactions. Moreover, the form emphasizes the importance of maintaining accurate vendor ledgers and outlines the responsibilities of property managers when it comes to authorizing payments and ensuring compliance with tax requirements. With these foundational elements, the Yardi Manual form stands as a critical tool for ensuring smooth accounts payable workflows in real estate management operations.
Yardi Manual Example

Yardi Voyager 6.0 Procedures Guide
Version 3: 2012.
Yardi Developments
Procedures Guide
Version 3: 2013.0424
1
Contents |
|
PAYABLES |
3 |
Vendor Overview |
3 |
Vendor Lookup |
3 |
Adding a New Vendor |
5 |
Vendor Ledger |
8 |
Payables Batch Processing |
10 |
Create Payable Batch |
10 |
Invoice Entry |
10 |
Distribute Payable Function |
12 |
Recording Manual Checks, Wires, Electronic Payments from Invoice |
13 |
Edit / Review / Post Payable Batch |
14 |
Batch Errors |
16 |
Review Payable |
16 |
Reversing Payables |
17 |
Pay Retention |
19 |
Check Writing |
20 |
Setup |
20 |
Approve Payables |
20 |
Process Checks |
21 |
Rewrite Checks |
23 |
Review Check |
24 |
Void Check |
25 |
2
ItPAYABLESwill be the Property Manager’s responsibility to perform the accounts payable function of vendor set up, entering invoices for payment, and cutting/signing checks. This section provides a tutorial of the accounts payable function.
Vendor Overview
The Vendor screen in Voyager is used to store all vendor related data such as name and address, 1099 information, discount and payment terms. A vendor must be created for any company or individual who will receive a payment out of the system. Each Vendor will maintain their own detailed ledger of payments, credits and adjustments. Vendors may be shared across properties or limited to a single property.
TIP: Prior to setting up a new vendor, make sure that the vendor does not already
exist by performing a vendor lookup, searching by company name or other information provided on
IIT Tip:
address on Tenant Billing Statements.
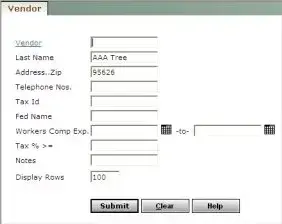
Vendor Lookup
Use the review vendor filter to access a single vendor record, a group of vendors, or all vendors. To review the vendor listing or to search for a specific vendor by name, address or other criteria, select:
Payables>Vendor>Review Vendor
EXAMPLE OF REVIEW VENDOR FILTER
3
Lookup Options:
Todepotview all vendors, click the CLEAR button on the filter, and then click SUBMIT.
To view vendors by name, enter all or part of the name in the Last Name field. For example, will locate Office Depot; Home Depot, etc.
Vendors can be filtered by City, Zip Code, Telephone Number, etc. by entering all or part of the information in the filter field.
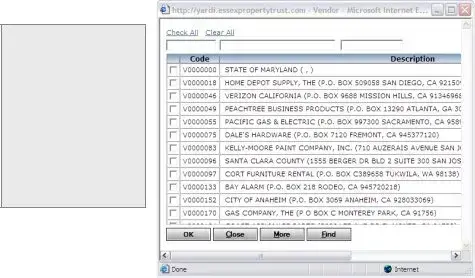
To search for a specific vendor before submitting the request, click the Vendor link to view the lookup list.
SEARCH FIELDS 1 Vendor Code
Enter search text in the desired field, and then click the
FIND button.
1 |
2 |
3 |
EXAMPLE OF VENDOR LOOKUP LIST
To select a vendor or vendors, click the checkbox next to the vendor code. Click OK. To view more records (in a long list of results) in the alphabetical listing, scroll to the
bottom of the list, then click the MORE button.
To close the list and return to the filter, click the CLOSE button. |
|
BEGINNING with the ext entered. For example, Smith will automatically return |
|
vendors such as Smith Brothers and Smith & Sons , but will NOT return results for |
|
TIP: The search text en ered in fields 1, 2 or 3 will search for any vendors |
|
Cohen, Smith and Turner Associates . To locate a vendor CONTAINING Smith |
|
*Smith . |
anywhere |
in the name, use the asterisk (WILDCARD SEARCH) before the search text, for example: |
|
To search by othderalcriteria,ID, entersuchtheasVendor’si suranceTaxexpirationID numberdate,inthennotes,TaxfederalID fieldtax. id number,
enter the data into the appropriate search field on the filter, click submit. For example to search on Fe
Click SUBMIT.
4
Adding a New Vendor
Payables>Vendor>Add Vendor
 EXAMPLE OF VENDOR SCREEN
DATA ENTRY STEPS:
Enter the Vendor Code using coding convention policy at left.
Enter the Vendor Name. In the case of an indivdual, enter the last name; otherwise enter the business name.
Enter the Vendor Address, including City, State, and ZIP Code. Enter at minimum one Telephone Number for the vendor
Enter additional telephone numbers and Email Address if available
Check the Consolidate flag to write a single check for multiple open invoices
Enter expiration dates for Workers Compensation and Liability Insurance certificates.
For vendors receiving 1099 forms, fill out the Tax Information section from the current W- 9 form
Gets 1099
Tax Identification Number Federal Tax Name
CheckEnter anyContractorapplicablecheckNotesboxfortothewithholdvendorretentions(optional)
Click SAVE
5
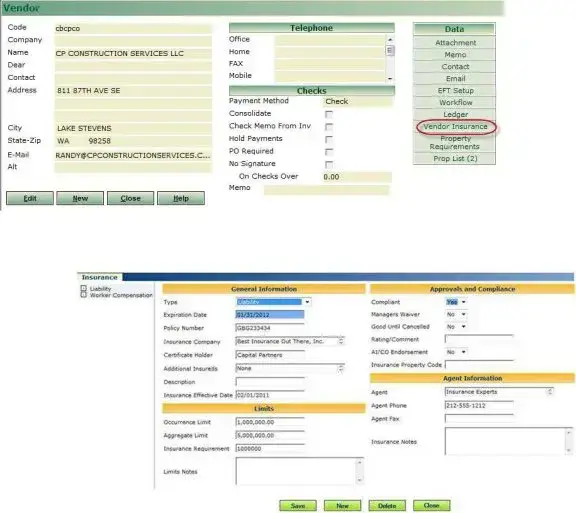
Enter Vendor’s Insurance Requirements
TIP: If insurance is expired, an invoice can be entered, but a check will not process until the insurance information is updated.
DATA ENTRY STEPS:
To enter or update the insurance certificate expiration, click on the Vendor Insurance link from the Vendor screen.
EXAMPLE OF VENDOR SCREEN
The Insurance screen will open:
EXAMPLE OF INSURANCE SCREEN
Type: Select from drop down
Expiration Date: Enter the expiration date
Compliant: Select Yes or No
Complete all additional fields as appropriate
Click SAVE
Click New to create additional records and repeat steps as needed, or click Close when complete.
6
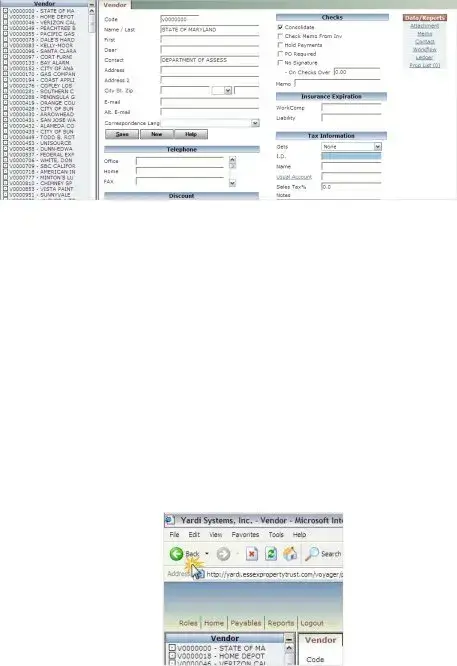
Vendor Screen Navigation
Vendor List |
Vendor Screen |
Vendor Data Links |
EXAMPLE OF VENDOR SCREEN WITH VENDOR LIST AT LEFT
Vendor Navigation Tips:
Click a vendor code/name on the vendor list on the left to load it to the screen
To edit information on the vendor screen, click directly in the field and enter the information.
Click SAVE to save any changes made to the vendor information screen
Click NEW to add a new vendor.
TIP: Not all users will have the ability to add or edit vendor information.
Vendor Data Links: |
|
|
|
|
Attachment |
To add attachments to the selected vendor |
|
|
Memo |
To add memos to the selected vendor. |
|
|
Ledger |
To print vendor ledger to the selected vendor. |
|
|
|
Prop List |
View / Add properties codes to the selected vendor for |
vendor/property security
To quickly return to the Vendor Filter from the Vendor screen and change your search, click the BACK button in Internet Explorer.
EXAMPLE OF INTERNET EXPLORER BACK BUTTON
To exit the Vendor screen completely, click the Home link.
7
To switch between the menu and the lookup list, click the Menu/Search Results tab found on the bottom of the vendor list.
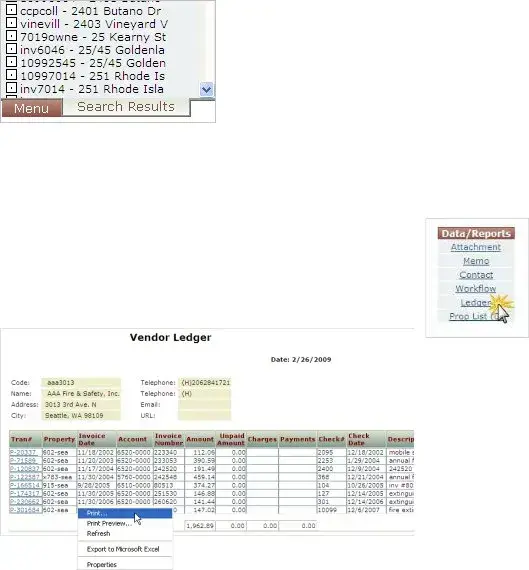
Vendor Ledger |
|
To view a list of payables for the vendor, click the Ledger link |
found under |
the Data/Reports heading on the right side of the Vendor screen. |
|
EXAMPLE OF VENDOR LEDGER REPORT
Printing the Ledger:
Right click on the ledger, and then click PRINT.
Choose the desired printer from the pick list and click Print
8
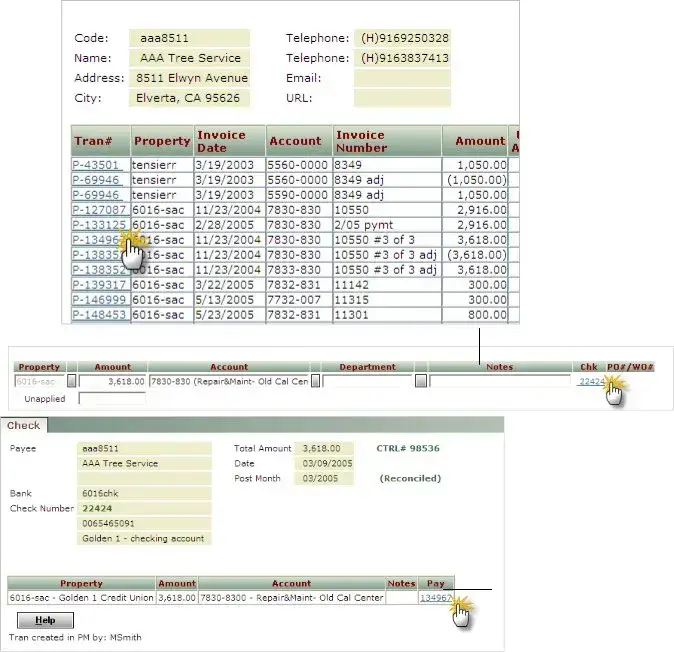
Viewing transactions from the ledger:
To drill down to payable transaction detail, click the Tran# link on the ledger report. Drill down to the check record from the payable screen by clicking the Chk link. Click the Pay link to return to the invoice screen.
Drill down from |
|
||
the Vendor |
|
||
Ledger to the |
|
||
invoice by |
|
Drill down from |
|
clicking the |
|||
the invoice to |
|||
|
|
||
Tran# link |
the check by |
||
|
|
clicking the Chk |
|
|
|
link |
|
Return to the invoice by clicking the Pay link
9
Payables Batch Processing
Create Payable Batch
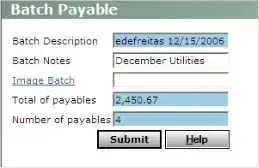
In the Yardi Voyager program, invoices are entered into batches which can be saved, reviewed, and edited before they are posted to the General Ledger. A batch may contain one or more invoices. Before a batch is created, invoices or invoice backup should be gathered, a count of the invoices, and a calculation of the total amount of the invoices to be entered should be noted. To begin a new batch, select:
SIDE MENU: Payables>Create Batch
TIP: To
navigate backward between the fields, click
EXAMPLE OF PAYABLE BATCH HEADER SCREEN
The Batch Description automatically fills with the user’s ID and a date/time stamp – do not modify.
In the Batch Notes field, enter notes to identify the batch contents.
In the Total of Payables field, enter the total dollar value of the items to be input.
In the Number of Payables field, enter a count of the items to be input.
Click SUBMIT to proceed.
TIP: If an error is made on the batch total or count, this information can be corrected at any time before the batch is posted
Invoice Entry
Begin entering payables as shown below. Use the TAB key to navigate between fields, or use the mouse to click into the desired field.
10
Form Characteristics
| Fact Name | Description |
|---|---|
| Yardi Version | This form follows the Yardi Voyager 6.0 Procedures Guide from 2012 and Yardi Developments Procedures Guide from 2013. |
| Vendor Data | The system stores comprehensive vendor information, including name, address, payment terms, and 1099 details. |
| Vendor Lookup | Users can search for vendors by various criteria such as name, city, and zip code. |
| Creating Vendors | A vendor must be set up before any payments can be processed through the system. |
| Consolidated Payments | Users have the option to consolidate payments for multiple invoices into one check. |
| Payment Processing | The property manager is responsible for vendor setup, invoice entry, and the issuing of checks. |
| Vendor Ledger | Each vendor maintains a detailed ledger of payments, credits, and adjustments. |
| 1099 Form Usage | Vendors eligible for 1099s must provide tax information based on the current W-9 form. |
| Search Customization | Search options include using wildcards for more flexible vendor name searches. |
| Check Functions | Various check functions include writing, rewriting, reviewing, and voiding checks as needed. |
Guidelines on Utilizing Yardi Manual
Filling out the Yardi Manual form requires attention to detail and organization. This process will guide you through entering vendor information, ensuring compliance with tax regulations, and establishing a clear record of transactions. By following these steps, you will have a systematic method to properly complete and submit your form.
- Open the Yardi Manual form and navigate to the appropriate section based on your needs.
- Start by performing a vendor lookup:
- Select Payables > Vendor > Review Vendor.
- Click the CLEAR button to view all vendors, or enter search criteria such as Vendor Code or Vendor Name.
- Click the FIND button to search for your vendor.
- Select the vendor by clicking the checkbox next to their code and click OK.
- If the vendor does not exist, proceed to add a new vendor:
- Select Payables > Vendor > Add Vendor.
- Enter the Vendor Code following the coding convention policy.
- Input the Vendor Name: the last name for individuals or the business name for companies.
- Fill in the Vendor Address, ensuring to include City, State, and ZIP Code.
- Enter at least one Telephone Number for the vendor.
- Add additional telephone numbers and Email Address if available.
- If necessary, check the Consolidate flag to issue a single check for multiple open invoices.
- Input expiration dates for Workers Compensation and Liability Insurance certificates.
- Complete the Tax Information section for vendors receiving 1099 forms, using the current W-9 form.
- If applicable, check the Contractor Check box for withhold vendor retentions.
- Click SAVE to record the new vendor's information.
What You Should Know About This Form
What is the purpose of the Yardi Manual form?
The Yardi Manual form serves as a guide for the accounts payable process within the Yardi Voyager system. It outlines procedures related to vendor management, invoice entry, payment processing, and check issuance. This form is designed to help property managers and staff understand their responsibilities when managing financial transactions with vendors.
How can I add a new vendor using the Yardi Manual form?
To add a new vendor, navigate to Payables > Vendor > Add Vendor in the Yardi system. You will need to enter specific details such as the Vendor Code, Vendor Name, and address, including City, State, and ZIP Code. Additionally, at least one telephone number is required. You can check the Consolidate flag if you wish to issue a single check for multiple invoices. Ensure you complete any necessary tax information if the vendor qualifies for a 1099 form. After filling in the relevant fields, click SAVE to complete the process.
What steps should I follow to search for an existing vendor?
To search for an existing vendor, go to Payables > Vendor > Review Vendor. You can utilize the vendor filter to narrow down your search by entering the vendor's name, city, state, or zip code. Click the FIND button after entering your search criteria. If the vendor exists, it will appear in the search results. You may also filter results using partial names or specific identifiers like vendor codes or contact numbers for more precise searches.
What information is required when setting up a vendor in the Yardi system?
When setting up a vendor, you need to provide several pieces of information. This includes the Vendor Code, Vendor Name, and full address, which must encompass the city, state, and ZIP Code. You are also required to enter at least one telephone number. For 1099 eligible vendors, complete the Tax Information section with pertinent details from the W-9 form. Additional details like email addresses, insurance expiration dates, and notes about contractor retention can also be included. Once all required fields are filled out, you must click SAVE to finalize the setup.
Common mistakes
When filling out the Yardi Manual form, one common mistake is failing to verify if the vendor already exists in the system. Before creating a new vendor, it’s crucial to perform a vendor lookup using the company name or details from the W-9 form. This step helps prevent duplication, which can lead to confusion and errors in accounting records. Missing this step can complicate future transactions and audits.
Another significant error is incomplete information when adding a new vendor. Each vendor entry requires specific details such as a Vendor Code, Name, Address, and at least one Telephone Number. Insufficient information may lead to difficulties in retrieving vendor records later, making it challenging to process payments or resolve discrepancies. Always double-check that all essential fields are filled out correctly.
Users often overlook the importance of using the correct coding conventions for Vendor Codes. Adhering to the designated coding policy ensures consistent and efficient tracking of vendor activities. This mistake can hinder the searchability of vendor records, making it tedious to pull up necessary information in the future.
When filling out the Tax Information section, many people misinterpret what is required. It’s key to accurately enter the Tax Identification Number and other details relevant to 1099 forms. Any inaccuracies can result in tax complications for both the vendor and the managing party. Ensure that the information provided matches the vendor’s W-9 form to avoid issues down the line.
Finally, another frequent misstep is neglecting to review and save the entries. After entering all information, it is essential to click SAVE to ensure that the vendor details are properly recorded in the system. Failing to do so can lead to a complete loss of data entered, causing delays in processing payments and requiring users to redo the work.
Documents used along the form
The Yardi Manual form is a crucial document used within the Yardi Voyager platform, particularly for managing payables and vendor data. However, it is often accompanied by various forms and documents that streamline processes and enhance efficiency. Understanding these associated documents can improve compliance and ease the overall workflow. Below are some of the common forms and documents used alongside the Yardi Manual form.
- W-9 Form: This form is essential for collecting taxpayer identification information from independent contractors and vendors. Businesses use the data on the W-9 to issue 1099 forms at year-end.
- 1099 Form: Issued to independent contractors and vendors who are paid $600 or more in a tax year, this form is crucial for reporting income to the IRS.
- Vendor Setup Request: This document initiates the process of adding a new vendor into the system. It includes essential details such as vendor names, addresses, and payment terms.
- Invoice Form: The invoice serves as a request for payment for goods and services rendered. It outlines the amount due, payment terms, and itemized descriptions.
- Purchase Order: This document formally requests a vendor to supply certain goods or services. It establishes a legal agreement on pricing and delivery terms.
- Check Request Form: Used to obtain authorization for payments, this form documents which invoices need to be paid and ensures proper review and approval.
- Payment Remittance Advice: This is sent to vendors to inform them of payment processing. It details the invoices being paid and can help avoid discrepancies regarding payments.
Using these documents in conjunction with the Yardi Manual form not only aids in maintaining compliance but also enhances the overall efficiency of financial operations. Ensuring all forms are accurately filled out and submitted timely can prevent delays and foster better relationships with vendors.
Similar forms
-
Accounts Payable Manual: Similar to the Yardi Manual form, an Accounts Payable Manual provides detailed guidance on the accounts payable process, including vendor management, invoice processing, and payment approvals. It often contains procedures for creating vendor records and managing financial transactions, ensuring that all aspects of accounts payable are comprehensively covered.
-
Vendor Management Guide: Much like the Yardi Manual form, a Vendor Management Guide outlines the procedures for adding, reviewing, and maintaining vendor information. It details how to verify vendor data and manage relationships, parallel to the Yardi guide’s structured approach to vendor setup and maintenance.
-
Invoice Processing Guide: This document shares similarities with the Yardi Manual form by detailing the steps required for invoice entry and processing. It covers invoice creation, approval workflows, and the methods for recording payments, much like the streamlined approach found in the Yardi manual.
-
Payment Processing Procedure: This document aligns with the Yardi Manual form by offering a clear framework for executing payments, including check writing and electronic payment methods. Both documents emphasize accountability in financial transactions, from initiation to completion, ensuring that all processes are followed meticulously.
Dos and Don'ts
When filling out the Yardi Manual form, it's essential to follow certain guidelines to ensure accuracy and compliance. Here’s a helpful list of dos and don'ts:
- Do perform a vendor lookup before creating a new vendor.
- Do use the appropriate coding conventions for the Vendor Code.
- Do fill out all necessary contact information, including a minimum of one telephone number.
- Do ensure that the Tax Information section is completed for vendors receiving 1099 forms.
- Don't skip entering critical information, such as the Vendor Address and Email Address if available.
- Don't forget to check the Consolidate flag if you need to write a single check for multiple invoices.
- Don't enter inaccurate or outdated information for insurance expiration dates.
- Don't create duplicate vendor entries without verifying existing records first.
Misconceptions
Here are 10 common misconceptions about the Yardi Manual form:
- All Vendors Must Be Entered Manually: Many believe that every vendor has to be set up from scratch. In reality, vendors can often be reused across different properties, minimizing repetitive data entry.
- The Form Is Only for Large Companies: Some think the Yardi Manual is only for large corporations. However, it is equally beneficial for smaller businesses managing accounts payable.
- Invoice Entry Is Complicated: It's a common belief that entering invoices is a tedious task. In fact, the system is designed to simplify this process with clear steps and filters.
- You Can’t Edit Vendor Information: Some users think that once a vendor is set up, their information cannot be altered. You can edit vendor details whenever necessary.
- Only One Person Can Access the Form: There's a misconception that only one person can use the Yardi Manual at a time. Many users can access the system concurrently, each with their own permissions.
- The Vendor Lookup Feature Is Limited: Some may think that the vendor lookup options are restricted. In reality, you can search by multiple fields like name, city, or even phone number.
- You Don’t Need to Check Existing Vendors: Some believe that setting up a new vendor is straightforward, but it’s crucial to perform a lookup to avoid duplicates.
- Manual Checks Cannot Be Recorded: There's a notion that manual checks can’t be documented in the form. In fact, the Yardi Manual includes clear steps for recording them.
- Training Isn’t Necessary: Some assume that anyone can figure out the Yardi Manual without training. However, a little training can prevent costly errors and streamline the process.
- All Necessary Features Are Easy to Find: Not all users realize that some features may require a bit of digging. Familiarizing yourself with the layout is key to efficiency.
Key takeaways
Here are key takeaways for filling out and using the Yardi Manual form:
- Understand Vendor Requirements: A vendor must be set up for anyone who will receive a payment. Ensure that you have all necessary details such as name, address, and payment terms ready before starting the entry process.
- Perform a Vendor Lookup: Always check if a vendor already exists in the system to avoid duplication. Use filters to search by name, address, or other criteria.
- Follow Data Entry Steps: When adding a new vendor, carefully input the vendor code, name, address, and key contact information. Ensure data is accurate and complete.
- Utilize Consolidation Options: If a vendor has multiple open invoices, consider checking the Consolidate flag. This allows you to write a single check for all invoices, simplifying the payment process.
- Document Insurance and Tax Details: Enter expiration dates for insurance certificates, and provide relevant tax identification information especially for vendors receiving 1099 forms.
- Check for Additional Notes: If there are any applicable contractor retention requirements, make sure to check the corresponding box in the notes section.
- Save Your Work: After entering all necessary details and reviewing for accuracy, remember to click SAVE to ensure that the vendor information is properly recorded in the system.
Browse Other Templates
Shipping Declaration,International Shipping Invoice,Export Documentation,Commercial Shipping Statement,Trade Invoice,Customs Declaration Form,Delivery Invoice,Freight Invoice,Import/Export Summary,Logistics Invoice - The form requires a thorough examination of the individual's financial activities.
Sc St-8a - Every resale transaction using the ST-8A should be thoroughly documented.
Roof Condition Report - Review the limitations noted in this certification to avoid future disputes.